> ## Documentation Index
> Fetch the complete documentation index at: https://docs.tracecat.com/llms.txt
> Use this file to discover all available pages before exploring further.
# Tunnels
> Connect Tracecat to private and on-premises services, such as an internal Splunk, through Pangolin tunnels restricted to exact hosts and ports.
## Overview
A tunnel lets actions in one workspace reach hosts on a private network without opening inbound firewall ports. Tracecat uses [Pangolin](https://docs.pangolin.net):
* A site connector (Newt) runs inside your network and opens an outbound tunnel to the Pangolin server.
* Pangolin grants the tunnel's machine client access to each allowed target, on its listed TCP ports only. UDP and ICMP are off.
* A tunnel gateway runs the machine client and forwards action traffic. It accepts only short-lived tokens for its own tunnel and workspace, connects only to the tunnel's allowed targets, and logs every connection.
Tunnels belong to one workspace. Every lookup, update, delete, and status check is scoped to the workspace in the request, so one workspace cannot read or use another workspace's tunnel.
Actions use a tunnel when you select it on the action or as the workflow's default tunnel. See [Route actions through a tunnel](#route-actions-through-a-tunnel).
## Requirements
* The `tunnels` Enterprise entitlement.
* `tunnel:read` to list tunnels and check status, and `tunnel:create`, `tunnel:update`, or `tunnel:delete` to manage them. Workspace admins and organization owners and admins hold all four; workspace viewers hold `tunnel:read`.
* A Pangolin server: Pangolin Cloud for Tracecat Cloud, or your own Pangolin deployment for self-hosted Tracecat. See [Configure Pangolin for self-hosted Tracecat](#configure-pangolin-for-self-hosted-tracecat).
## Set up a tunnel from start to finish
This guide takes you from nothing to a workflow that calls an internal URL, using an on-premises Splunk at `https://splunk.internal:8089` as the example. On Tracecat Cloud you only run the site connector inside your network; Tracecat runs the gateway.
### Before you start
* The `tunnels` entitlement and the `tunnel:create` scope in the workspace.
* The internal hostname or IP address and TCP port of each service, such as `splunk.internal:8089`.
* A Linux host inside your network, with Docker or the ability to run a binary, that can resolve and reach every service. It needs outbound access to the Pangolin endpoint, `https://app.pangolin.net` on Tracecat Cloud, and no inbound ports. The connector uses TCP 443 and UDP 51820 to the Pangolin endpoint.
* The PEM-encoded CA certificate if an internal CA signs the service's certificate.
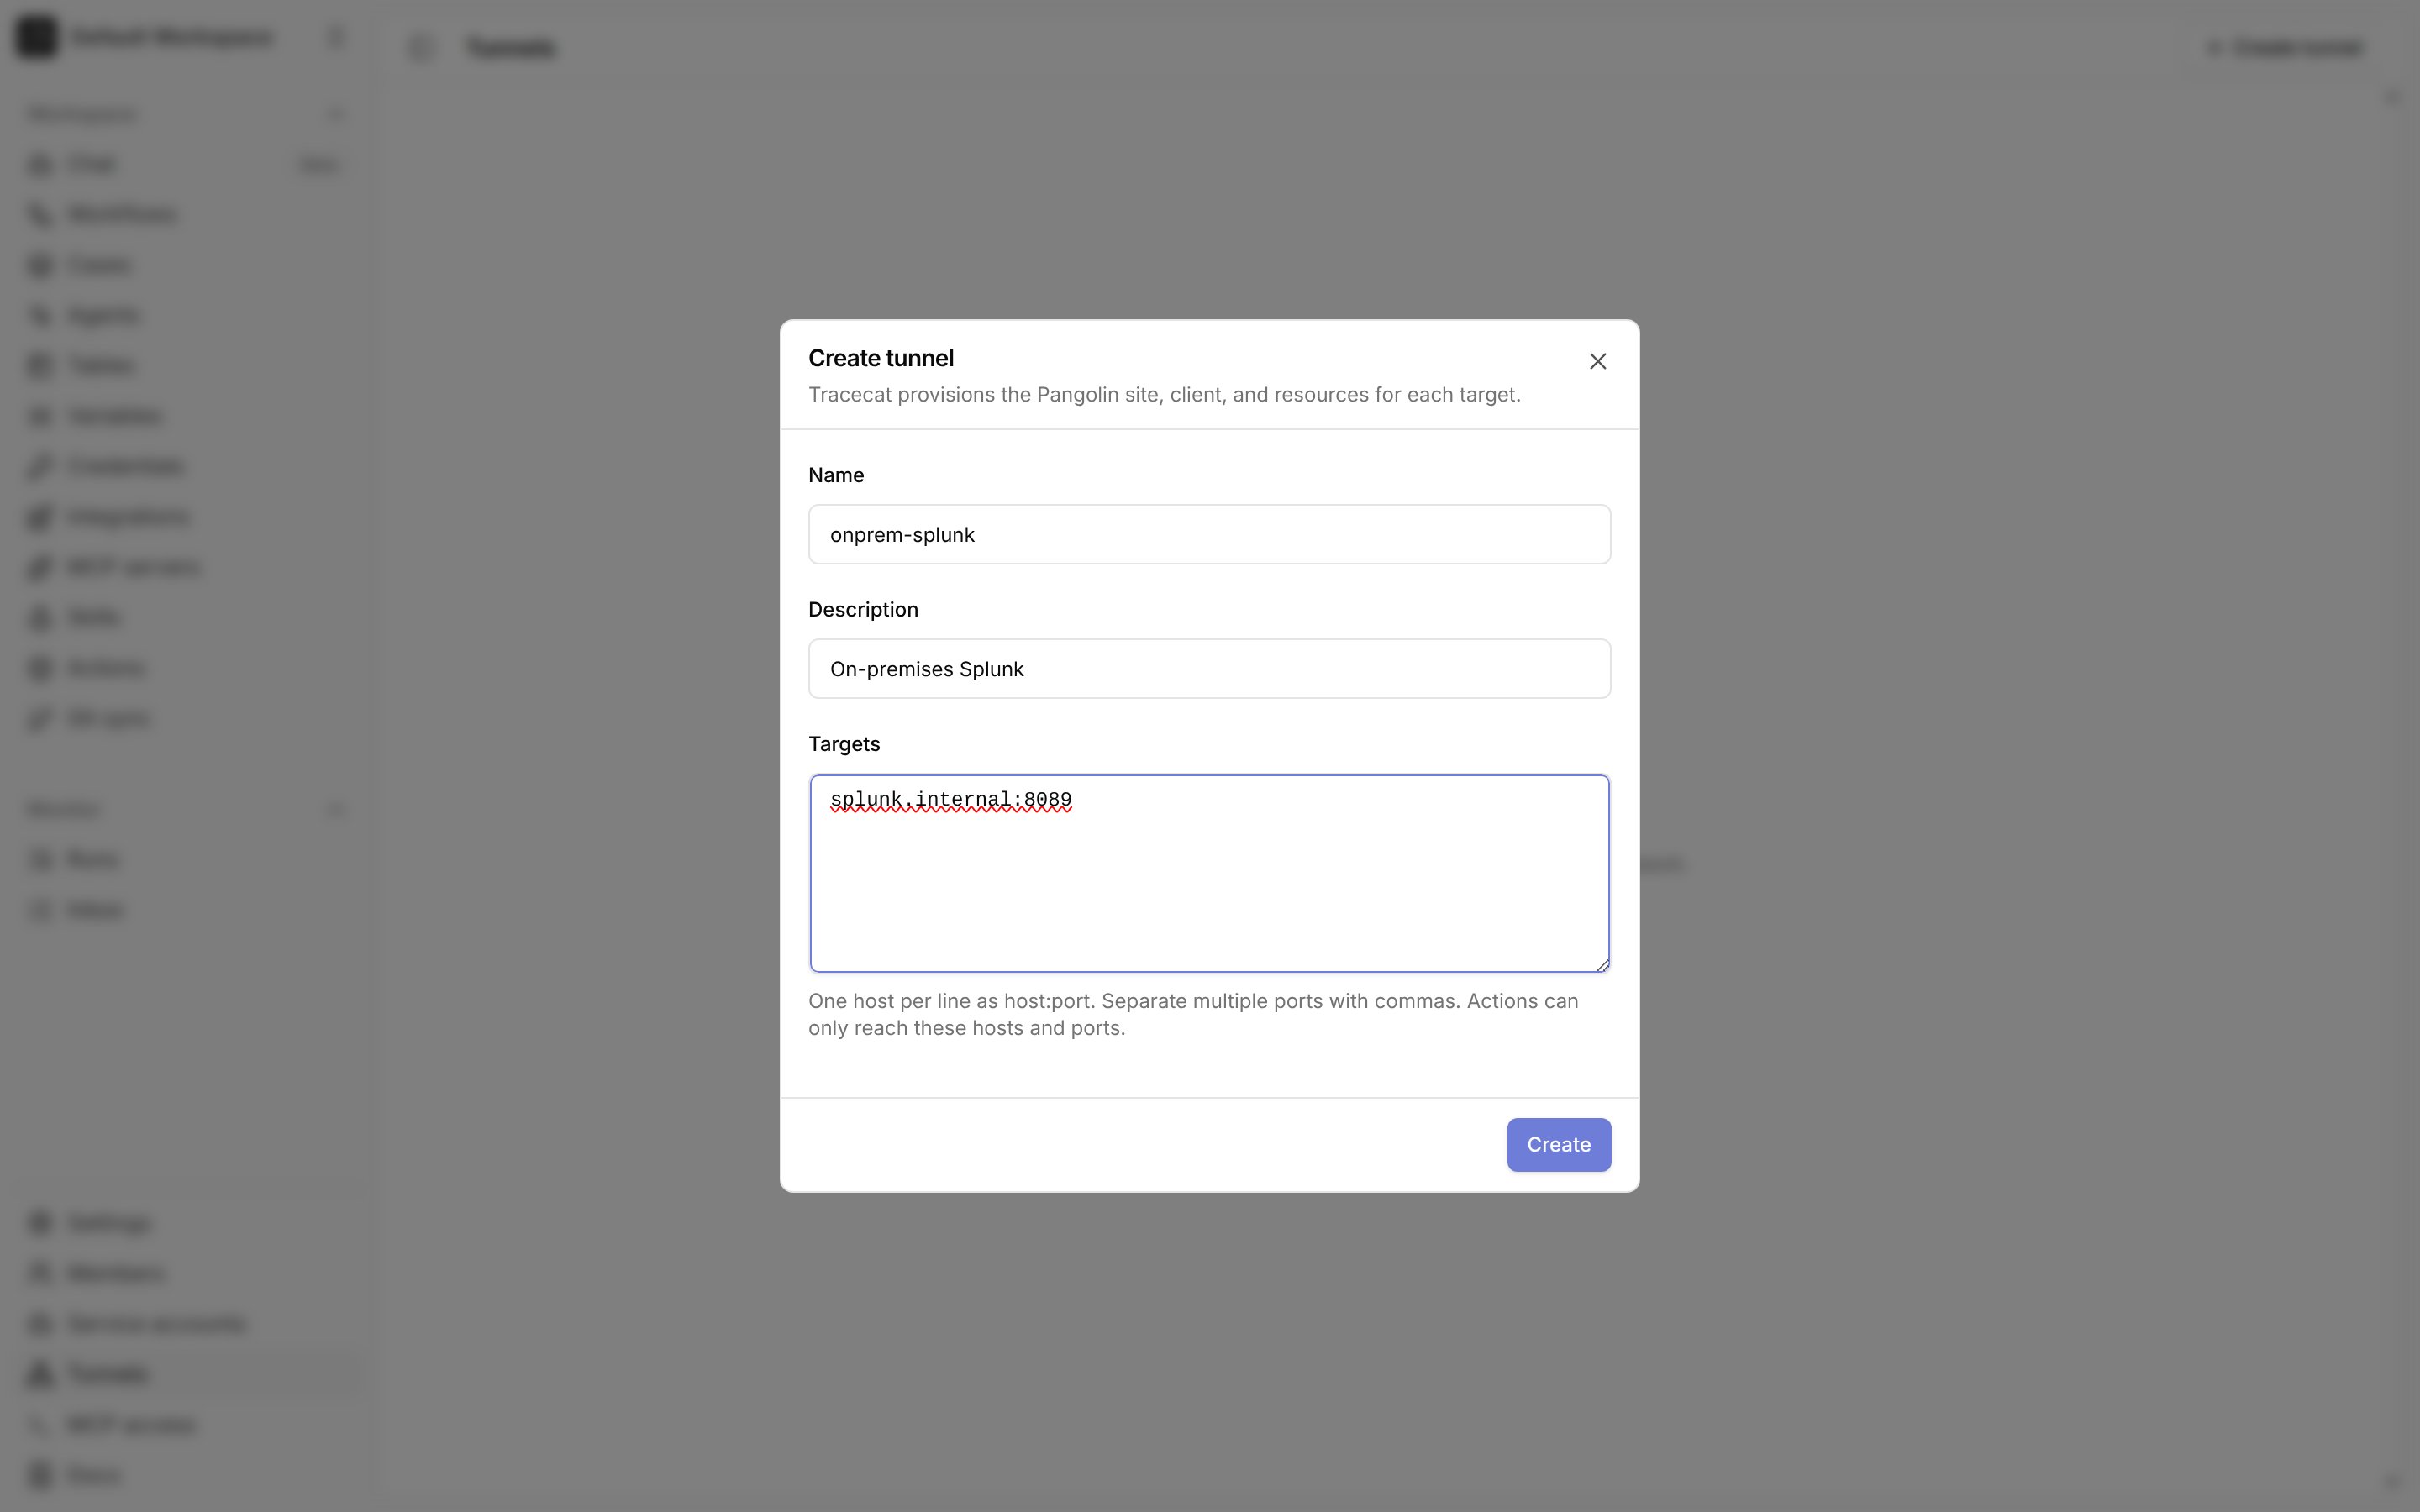
In the workspace sidebar, open **Tunnels** and select **Create tunnel**. Enter a name, such as `onprem-splunk`, and list one target per line as `host:port`, or `host:port,port` for several ports. Use the exact hostname your workflows will call; wildcards and CIDR ranges are rejected. Select **Create tunnel**.
 Tracecat shows the site connector command once. It contains the site ID, the site secret, and the Pangolin endpoint. Copy it, and store the secret in your secrets manager.
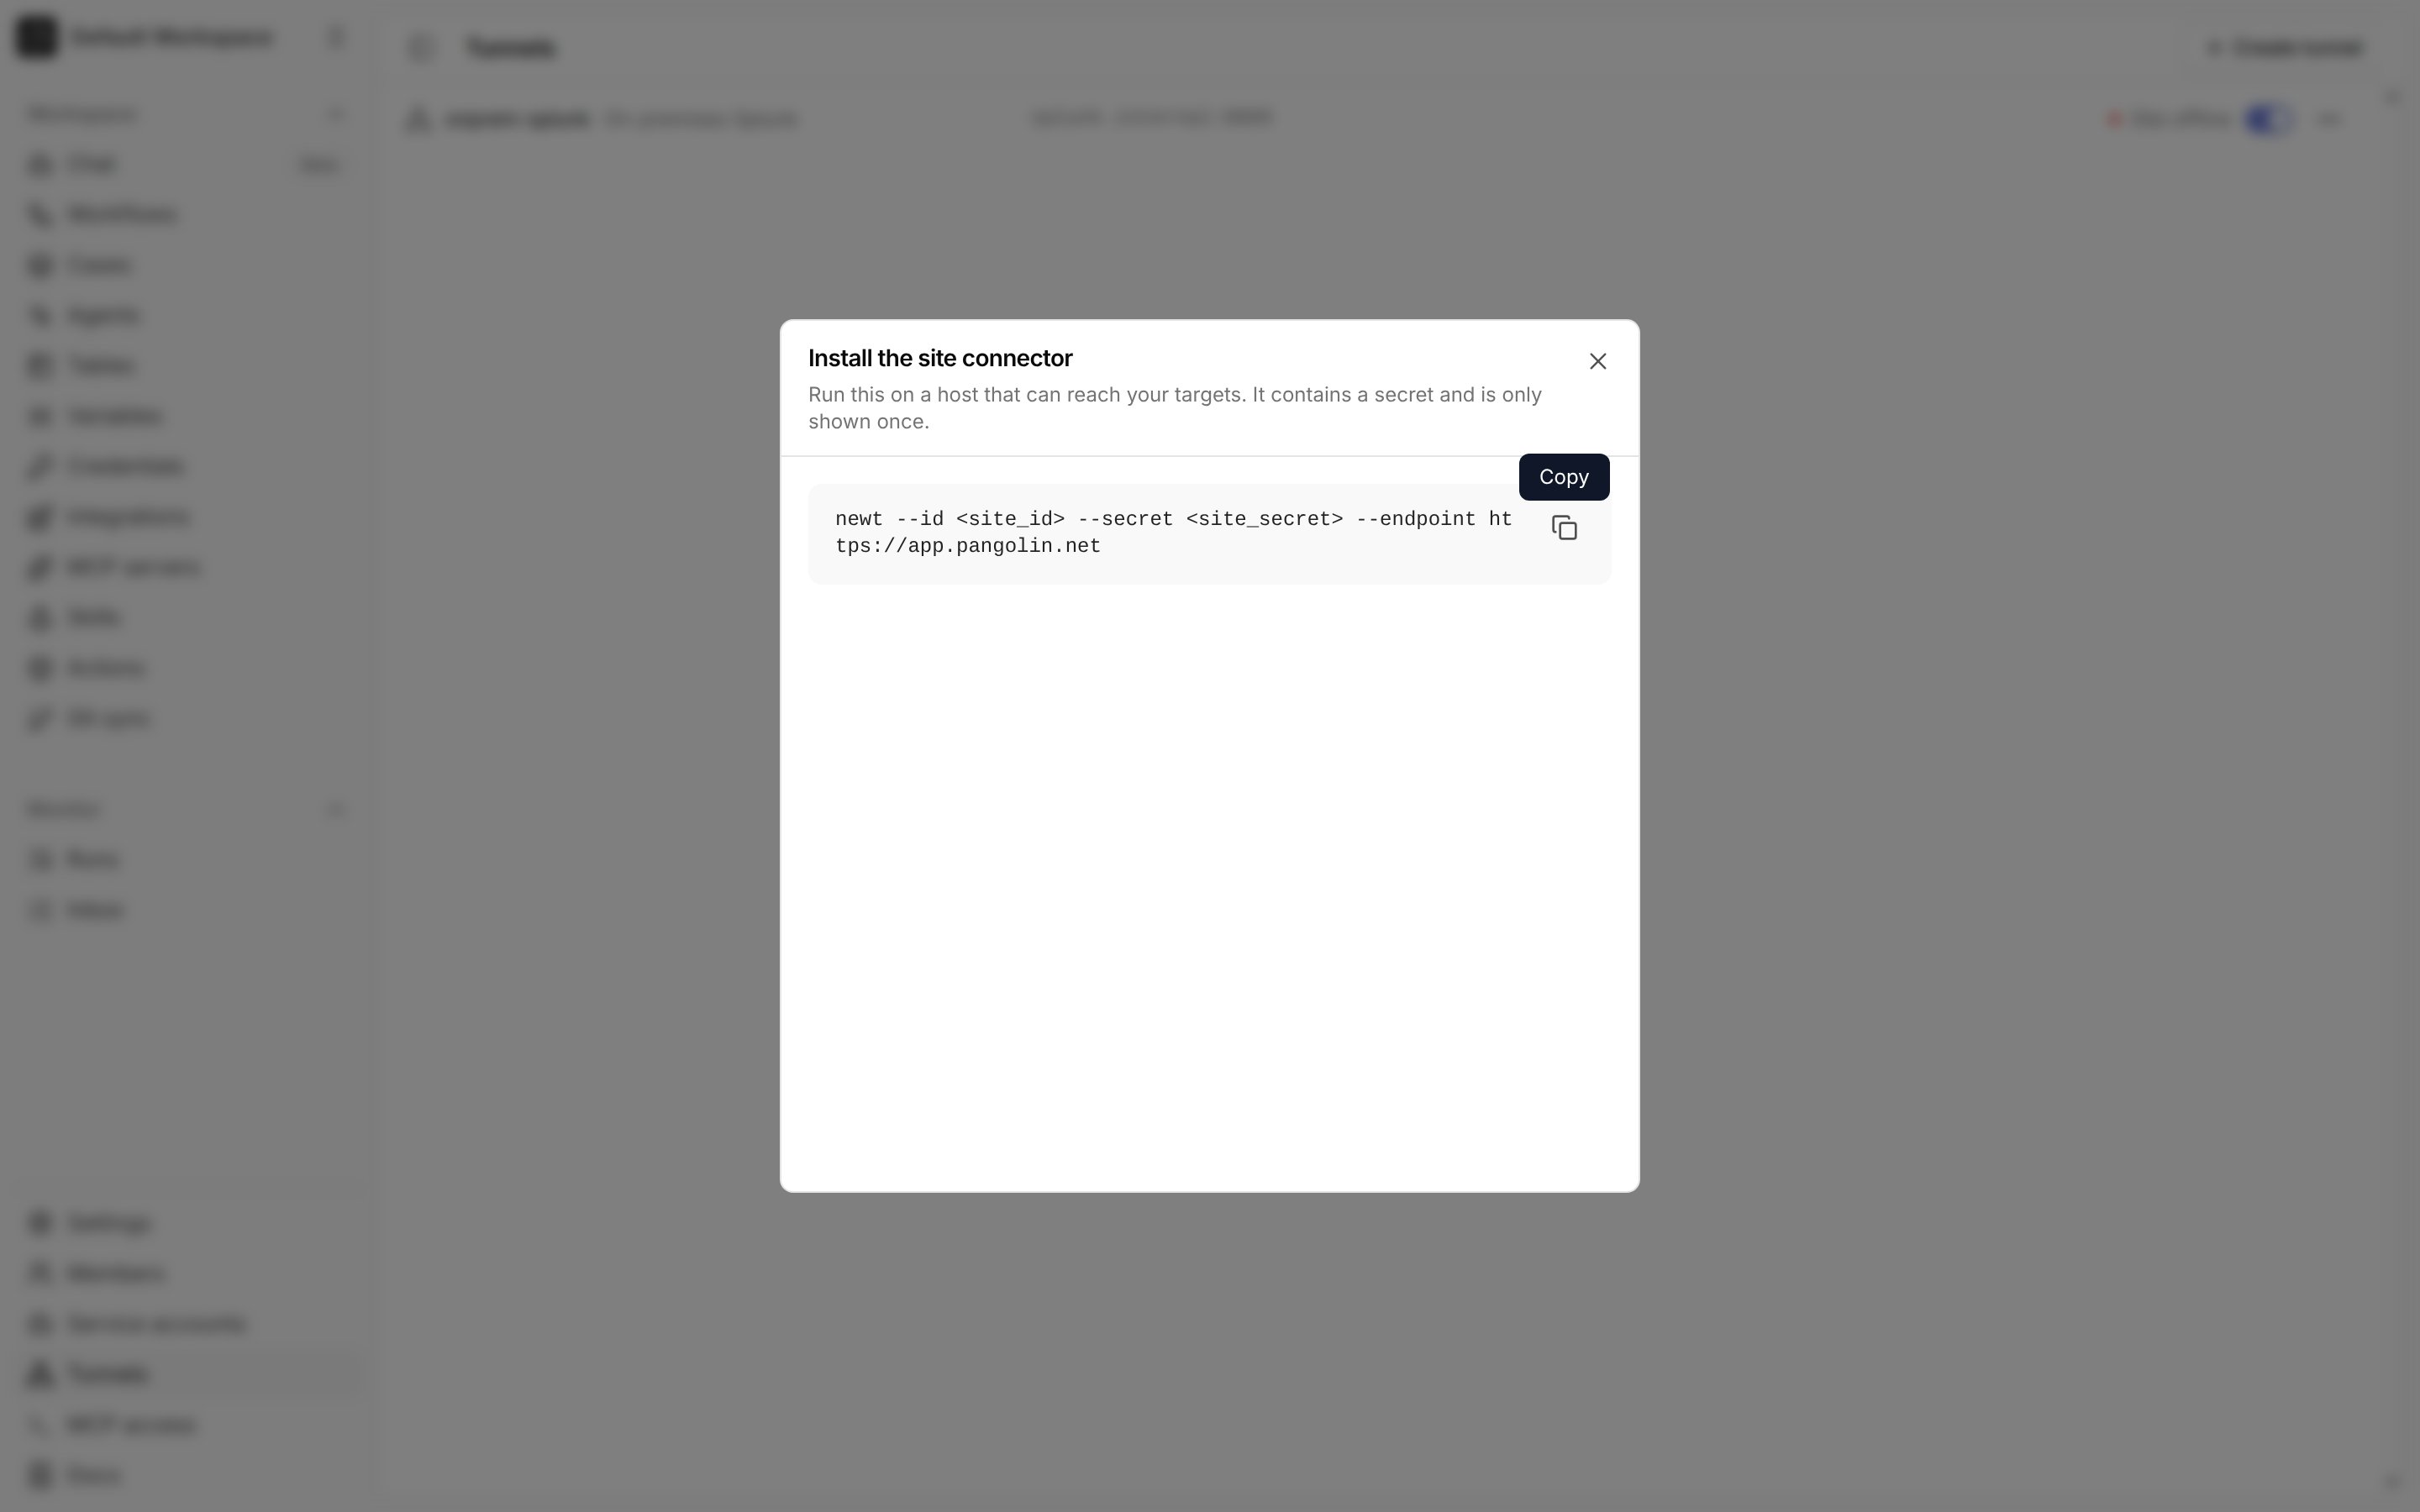 On the host inside your network, run the connector (Newt) with the values from the command. With Docker:
```bash theme={null}
docker run -d --name tracecat-tunnel --restart unless-stopped \
-e PANGOLIN_ENDPOINT=https://app.pangolin.net \
-e NEWT_ID= \
-e NEWT_SECRET= \
fosrl/newt
```
Without Docker, install the `newt` binary from the [Newt releases](https://github.com/fosrl/newt/releases) and run the copied command, `newt --id --secret --endpoint https://app.pangolin.net`, under a service manager such as systemd so it restarts with the host.
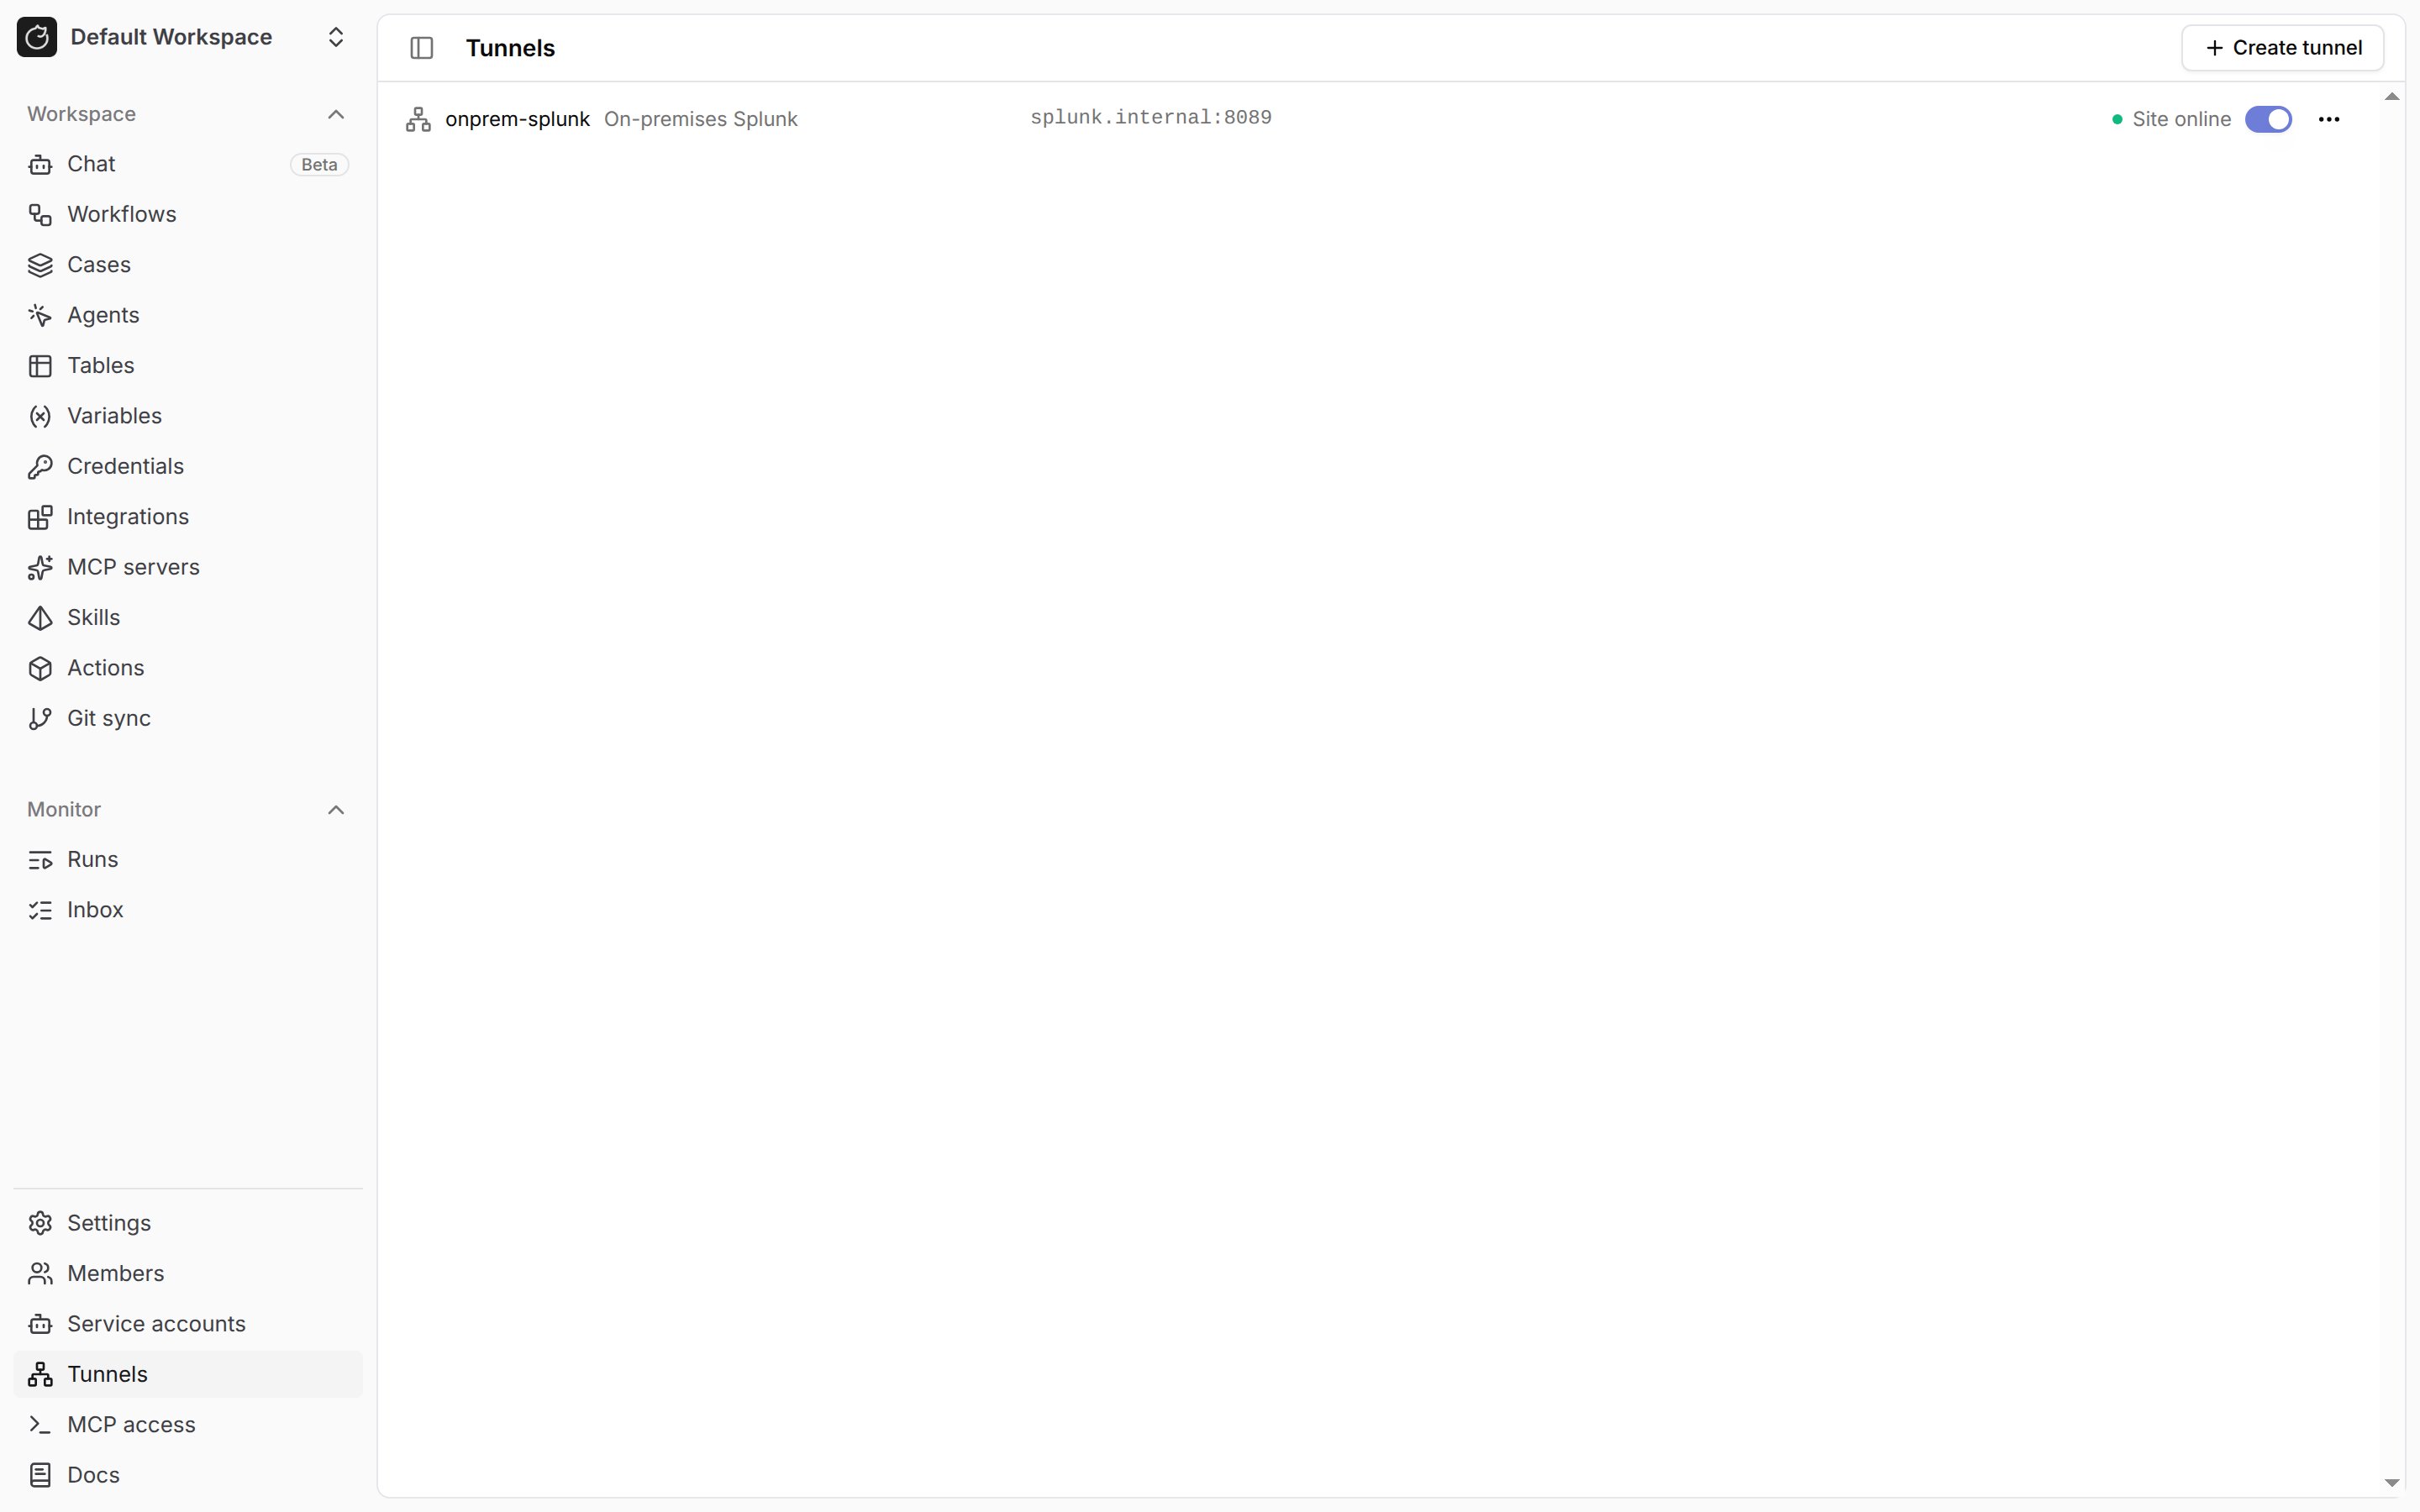
Back on the **Tunnels** page, the tunnel shows **Site online** once the connector connects and **Gateway ready** once Tracecat's gateway for the tunnel is running. Both must be green before actions can use the tunnel.
On the host inside your network, run the connector (Newt) with the values from the command. With Docker:
```bash theme={null}
docker run -d --name tracecat-tunnel --restart unless-stopped \
-e PANGOLIN_ENDPOINT=https://app.pangolin.net \
-e NEWT_ID= \
-e NEWT_SECRET= \
fosrl/newt
```
Without Docker, install the `newt` binary from the [Newt releases](https://github.com/fosrl/newt/releases) and run the copied command, `newt --id --secret --endpoint https://app.pangolin.net`, under a service manager such as systemd so it restarts with the host.
Back on the **Tunnels** page, the tunnel shows **Site online** once the connector connects and **Gateway ready** once Tracecat's gateway for the tunnel is running. Both must be green before actions can use the tunnel.
 If an internal CA signs the service's certificate, open **Credentials**, select **Add credential**, name it `ca_cert`, set **Type** to **CA certificate**, and paste the PEM certificate. See [Use TLS with private services](#use-tls-with-private-services).
In a workflow, add a **HTTP request** (`core.http_request`) action. Set **URL** to the internal URL, such as `https://splunk.internal:8089/services/server/info?output_mode=json`, and **Method** to `GET`. In the action's **Control flow** tab, set **Tunnel** to `onprem-splunk`.
If an internal CA signs the service's certificate, open **Credentials**, select **Add credential**, name it `ca_cert`, set **Type** to **CA certificate**, and paste the PEM certificate. See [Use TLS with private services](#use-tls-with-private-services).
In a workflow, add a **HTTP request** (`core.http_request`) action. Set **URL** to the internal URL, such as `https://splunk.internal:8089/services/server/info?output_mode=json`, and **Method** to `GET`. In the action's **Control flow** tab, set **Tunnel** to `onprem-splunk`.
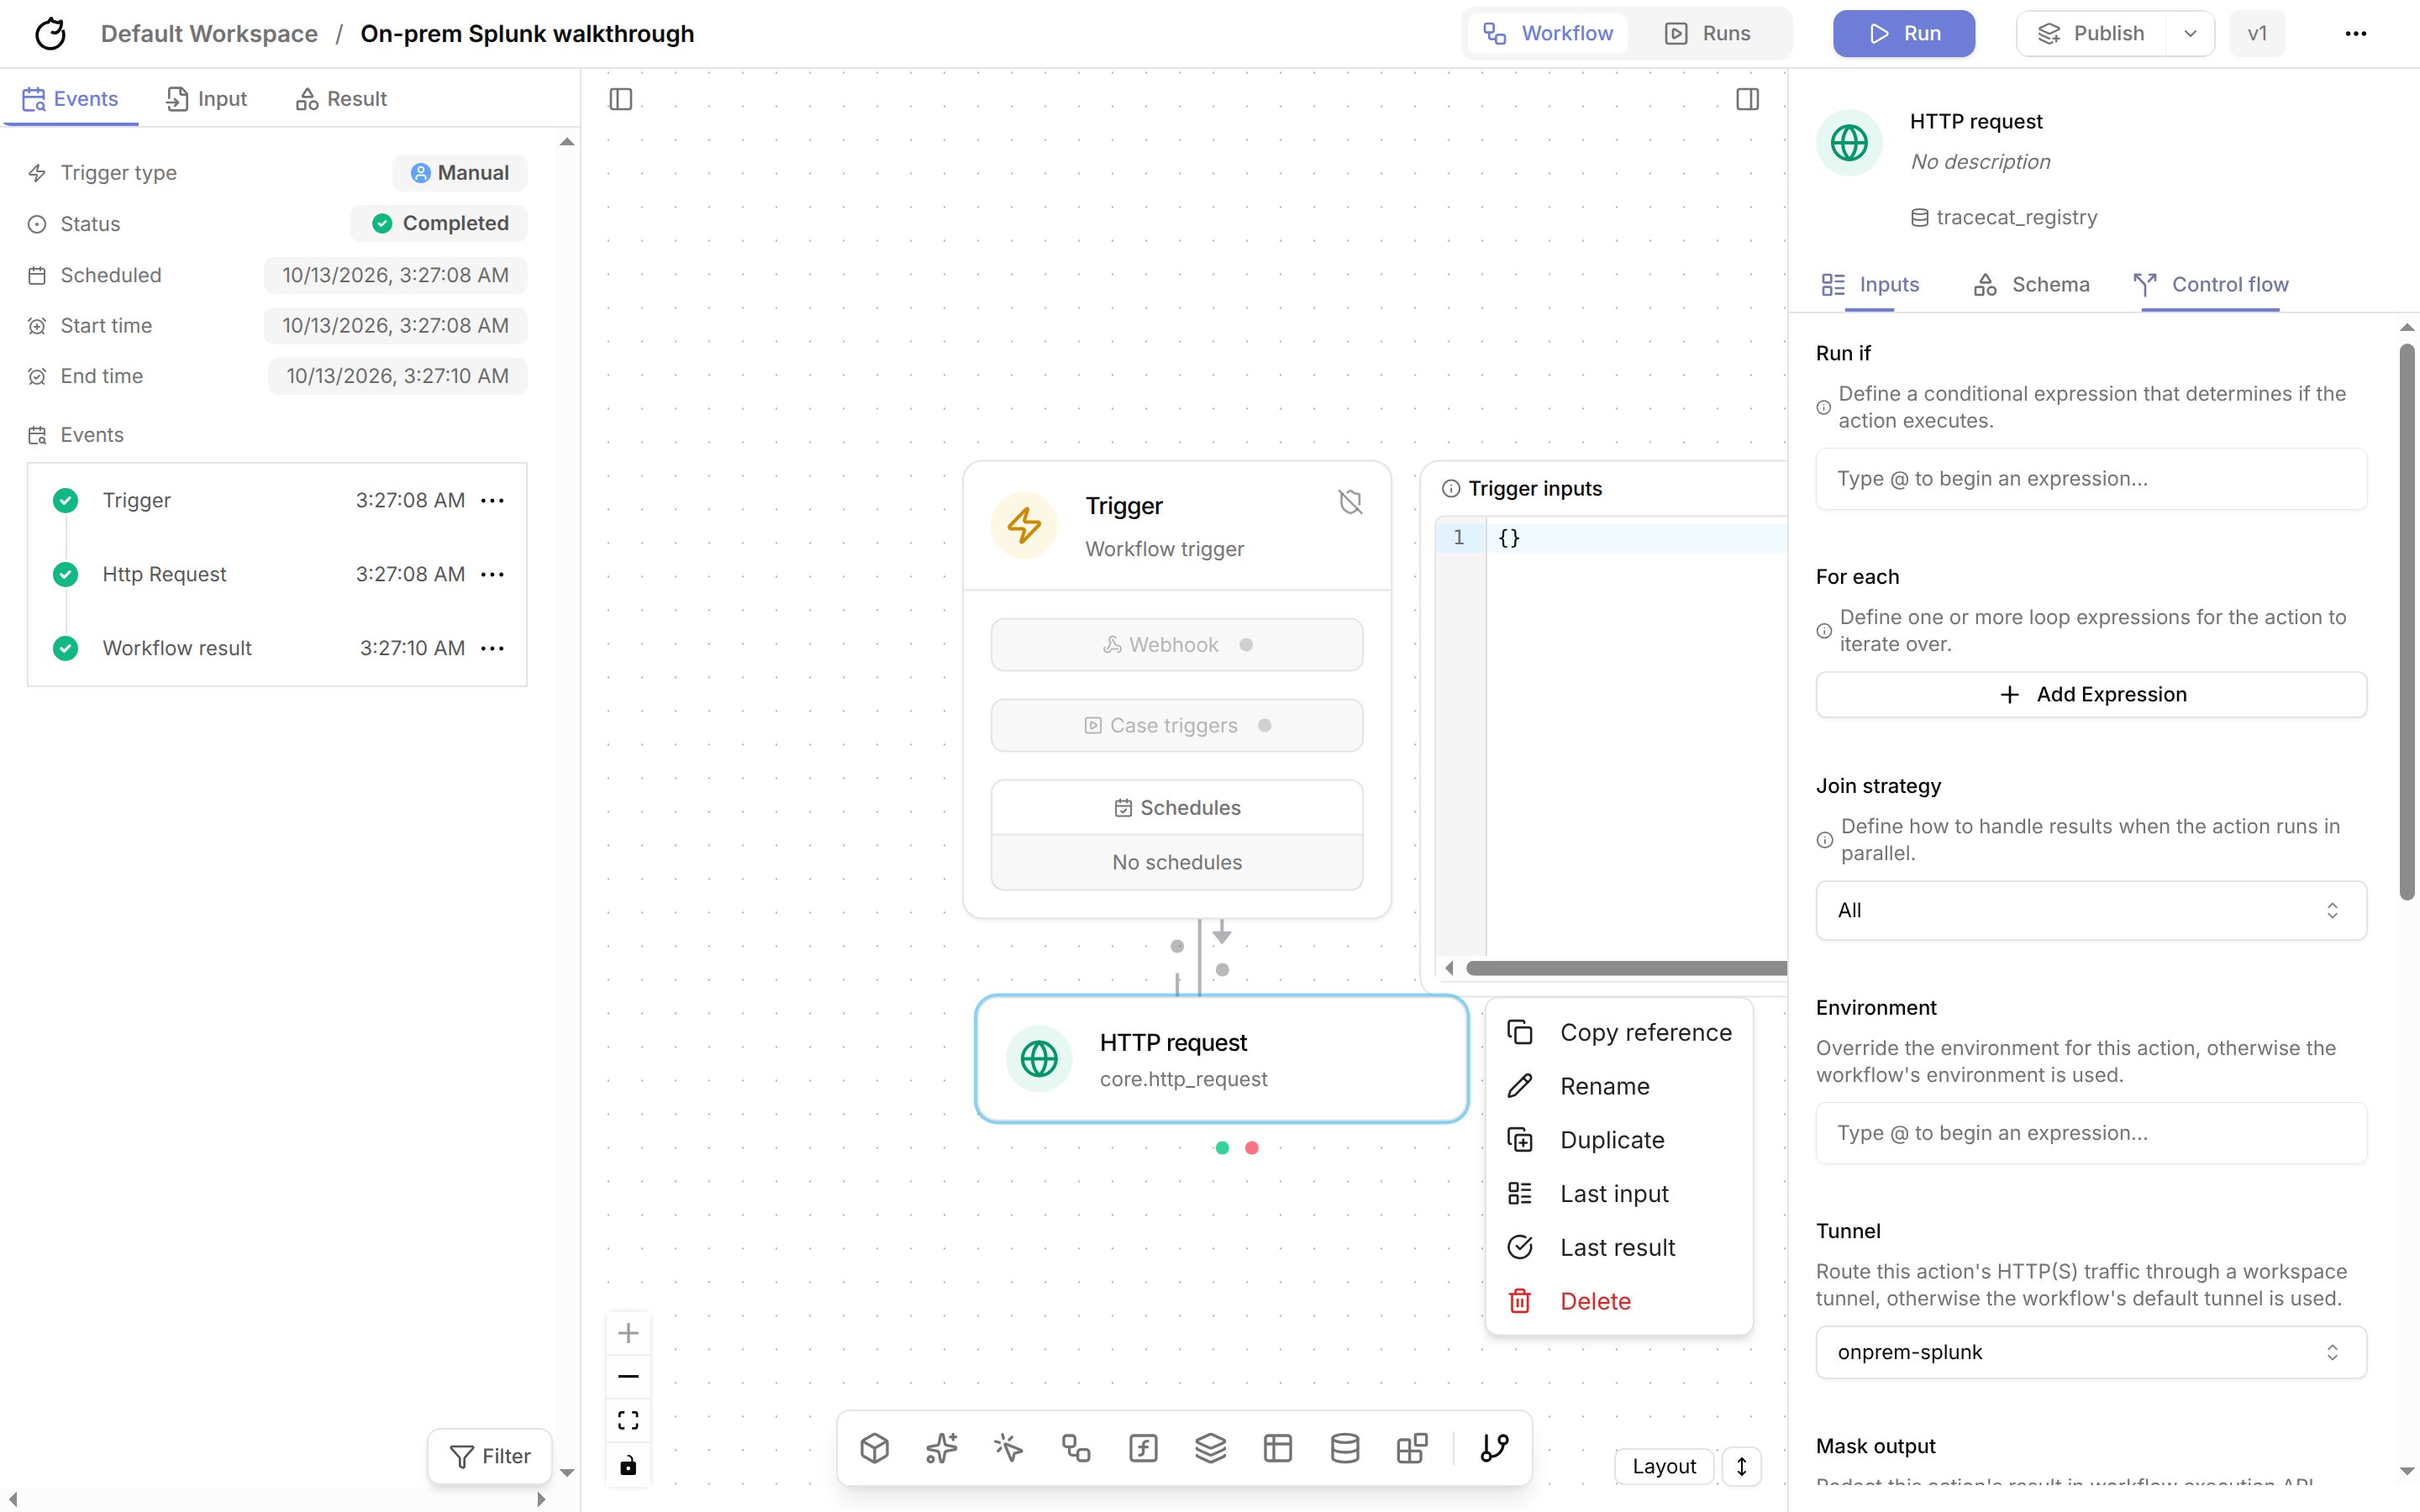 To route every action in the workflow, set **Default tunnel** in the workflow settings instead. An action's own **Tunnel** overrides the default.
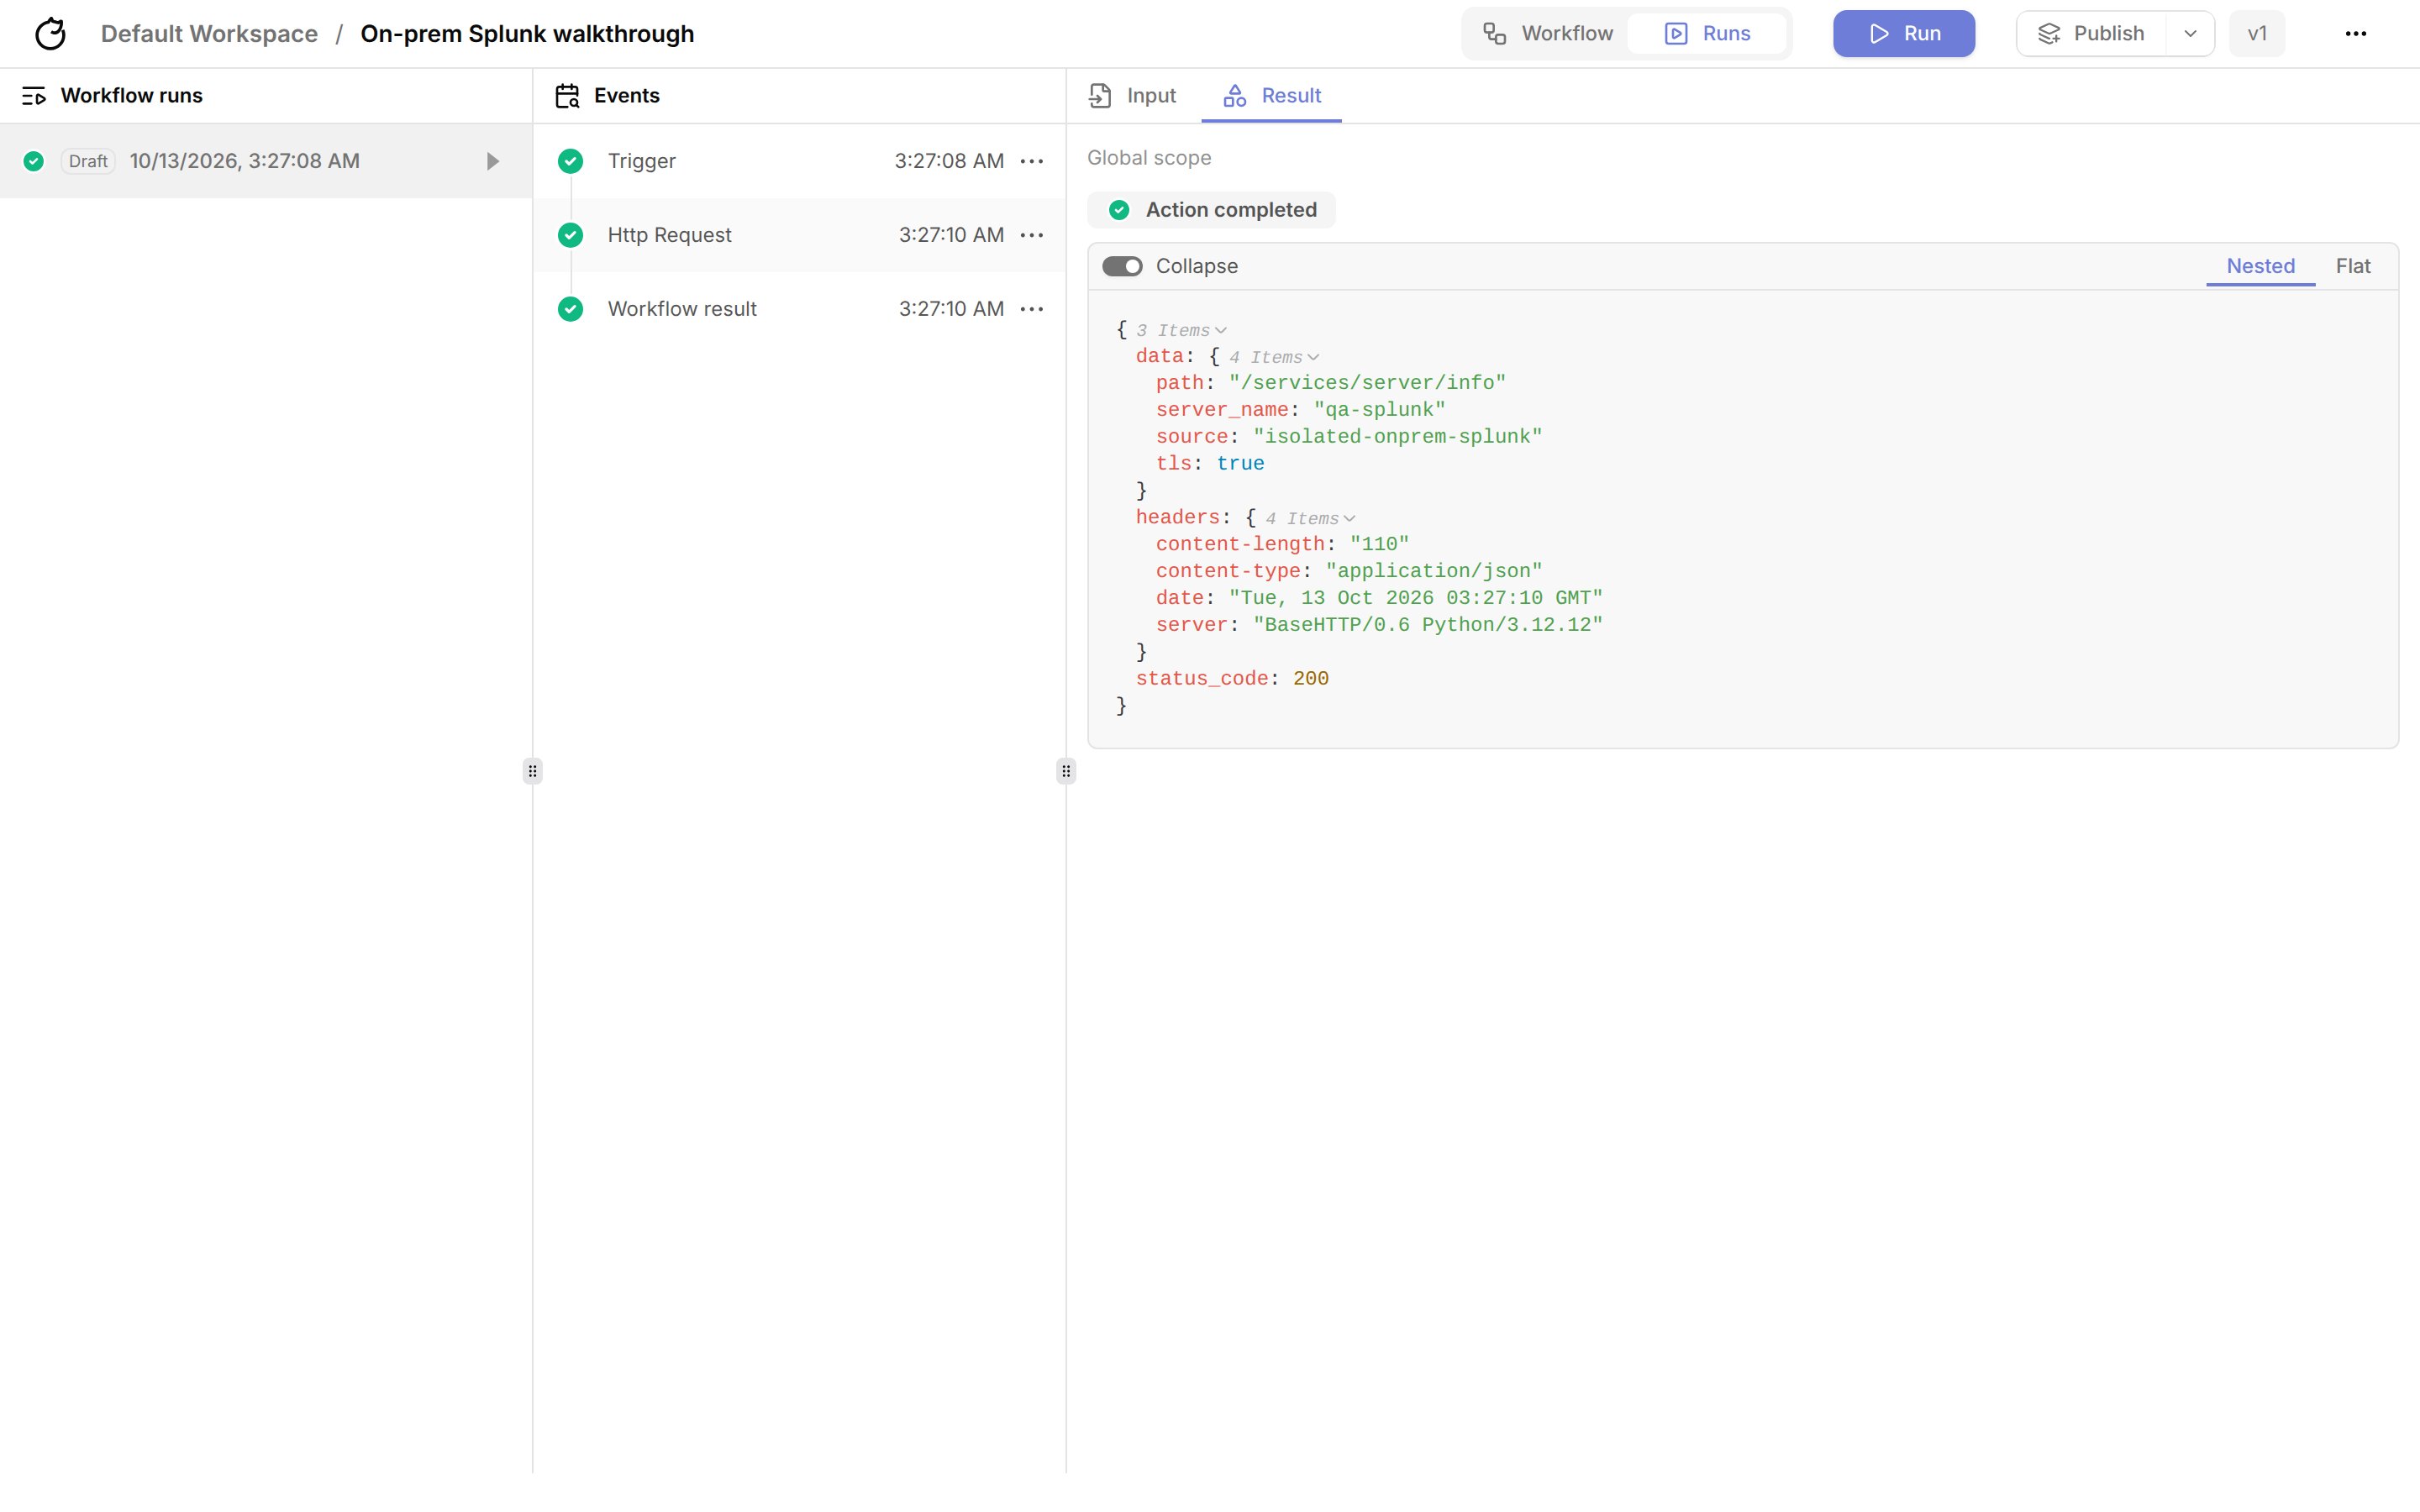
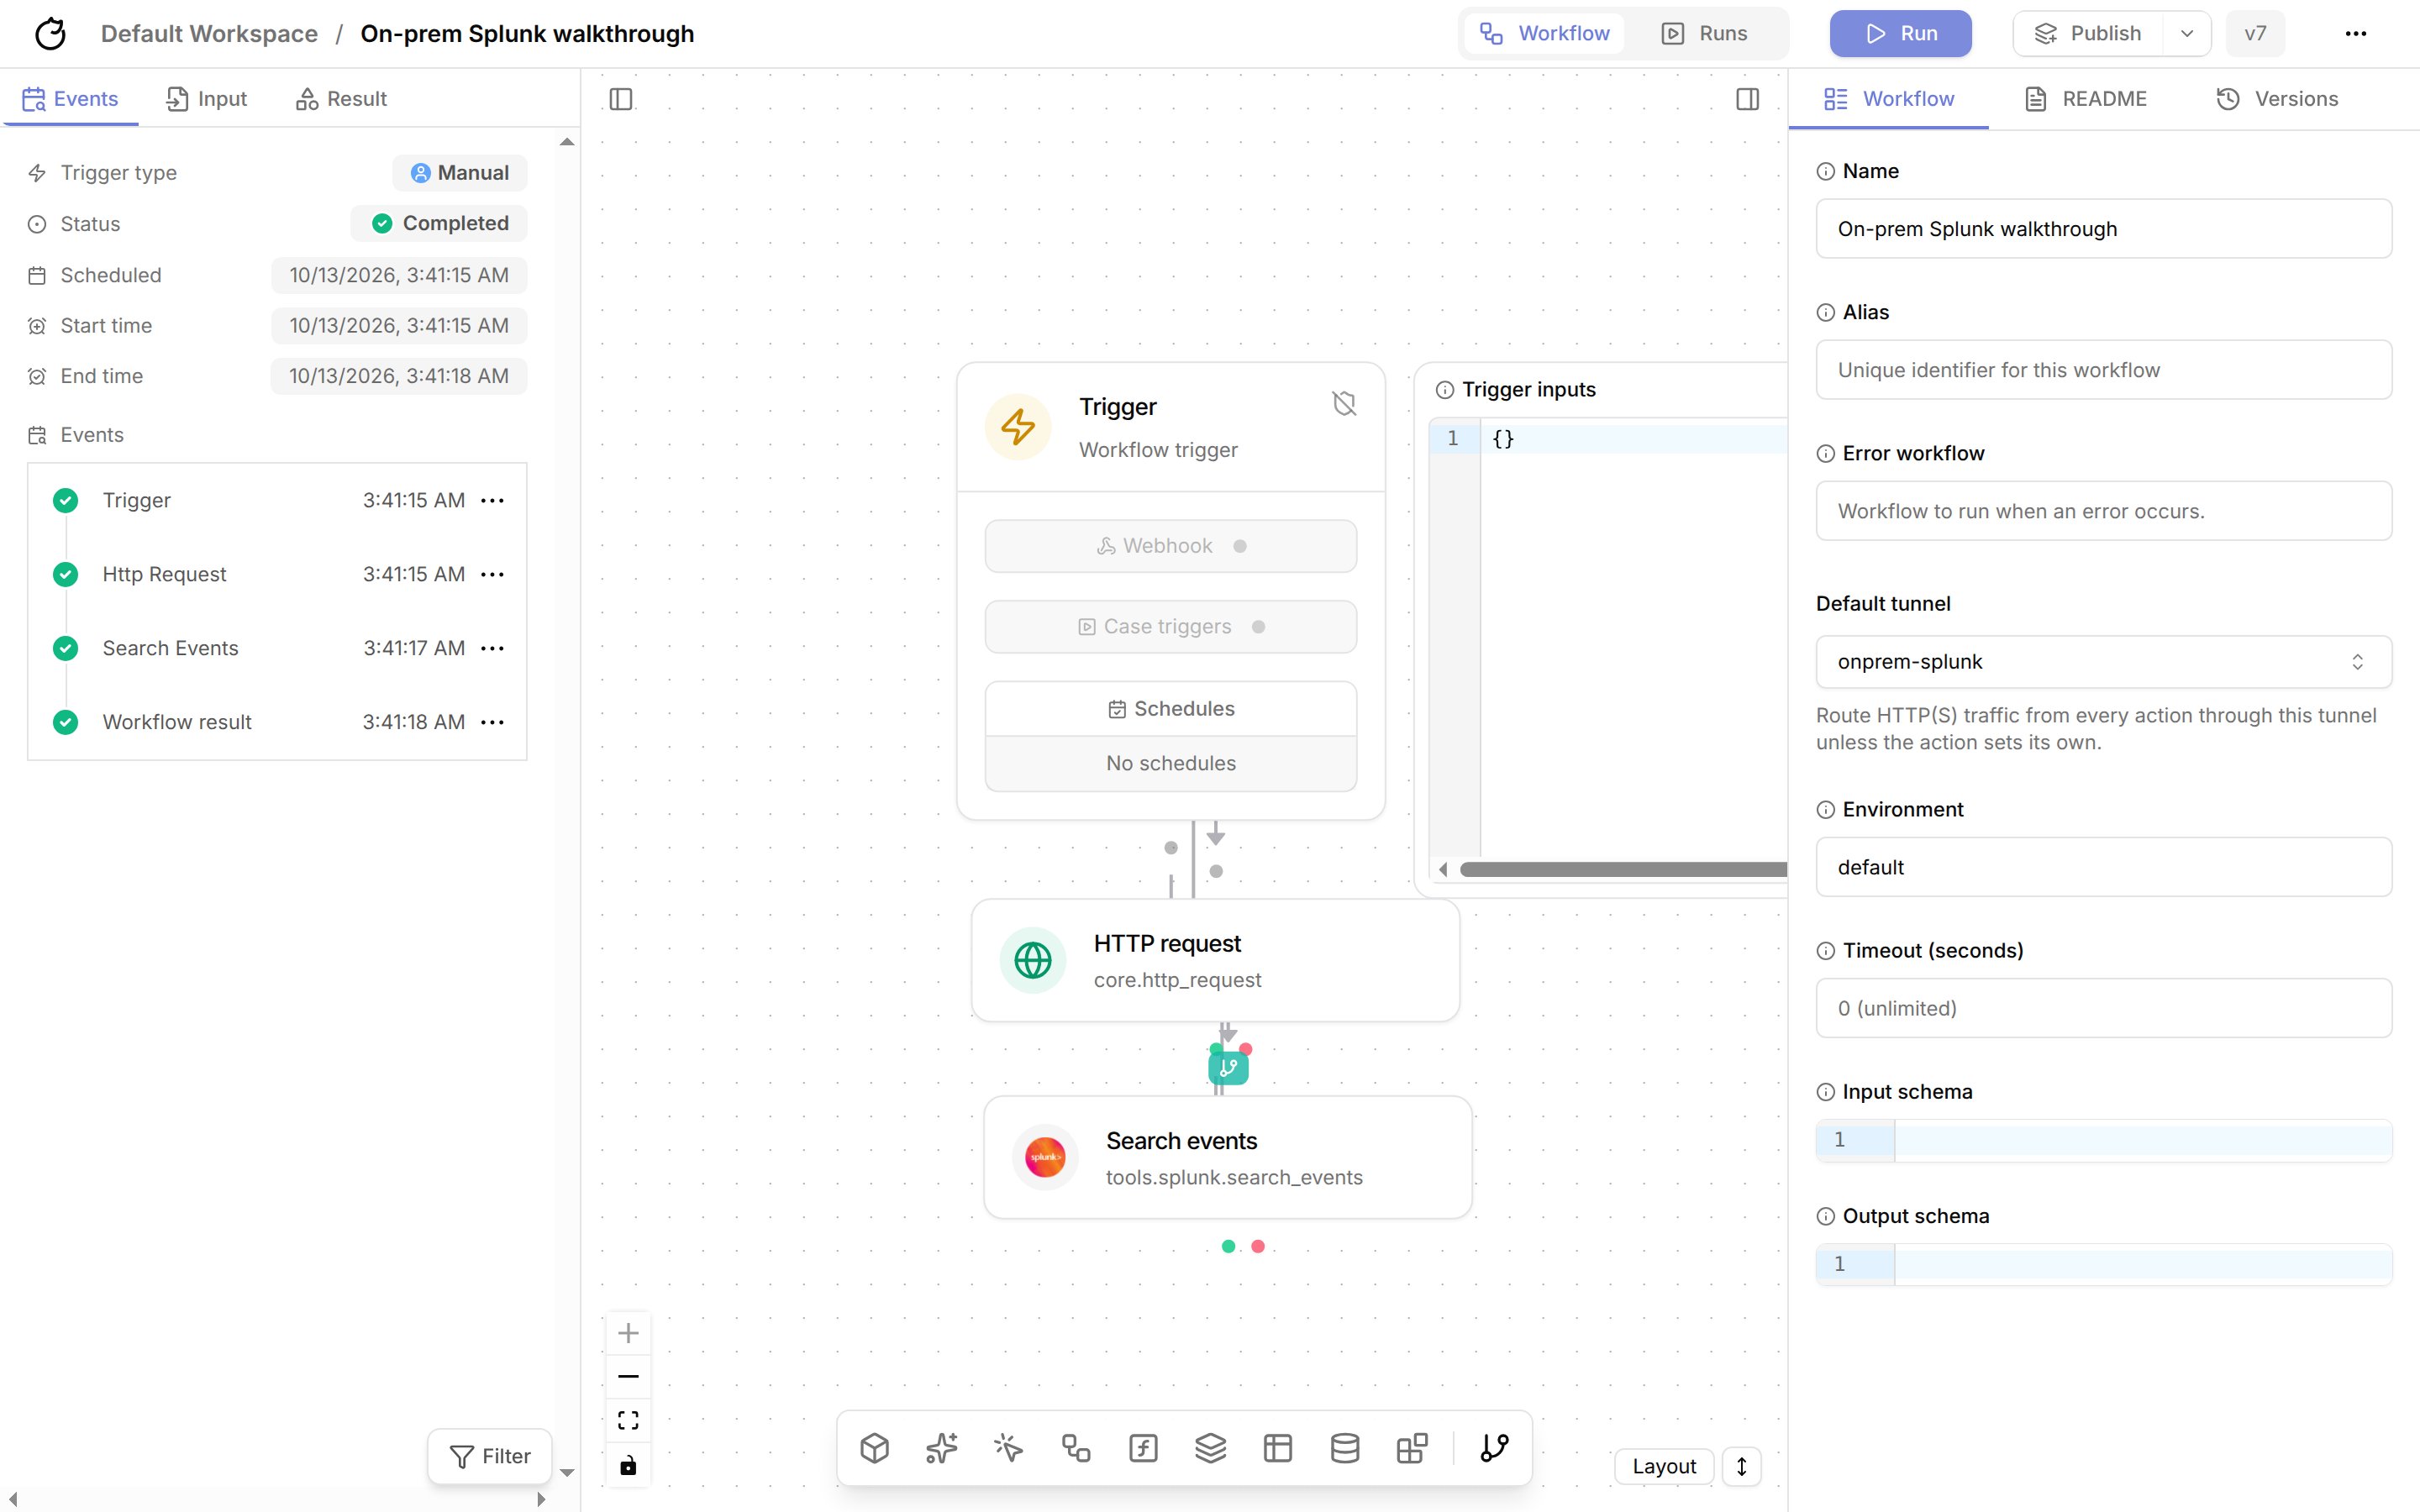 Save, then run the workflow. The action's result shows the response from the internal service.
 ### Run a Splunk search through the tunnel
Integration actions that make HTTP requests, such as **Splunk: Search events** (`tools.splunk.search_events`), use the tunnel the same way.
In **Credentials**, add a credential named `splunk` with the key `SPLUNK_API_KEY` set to a Splunk authentication token.
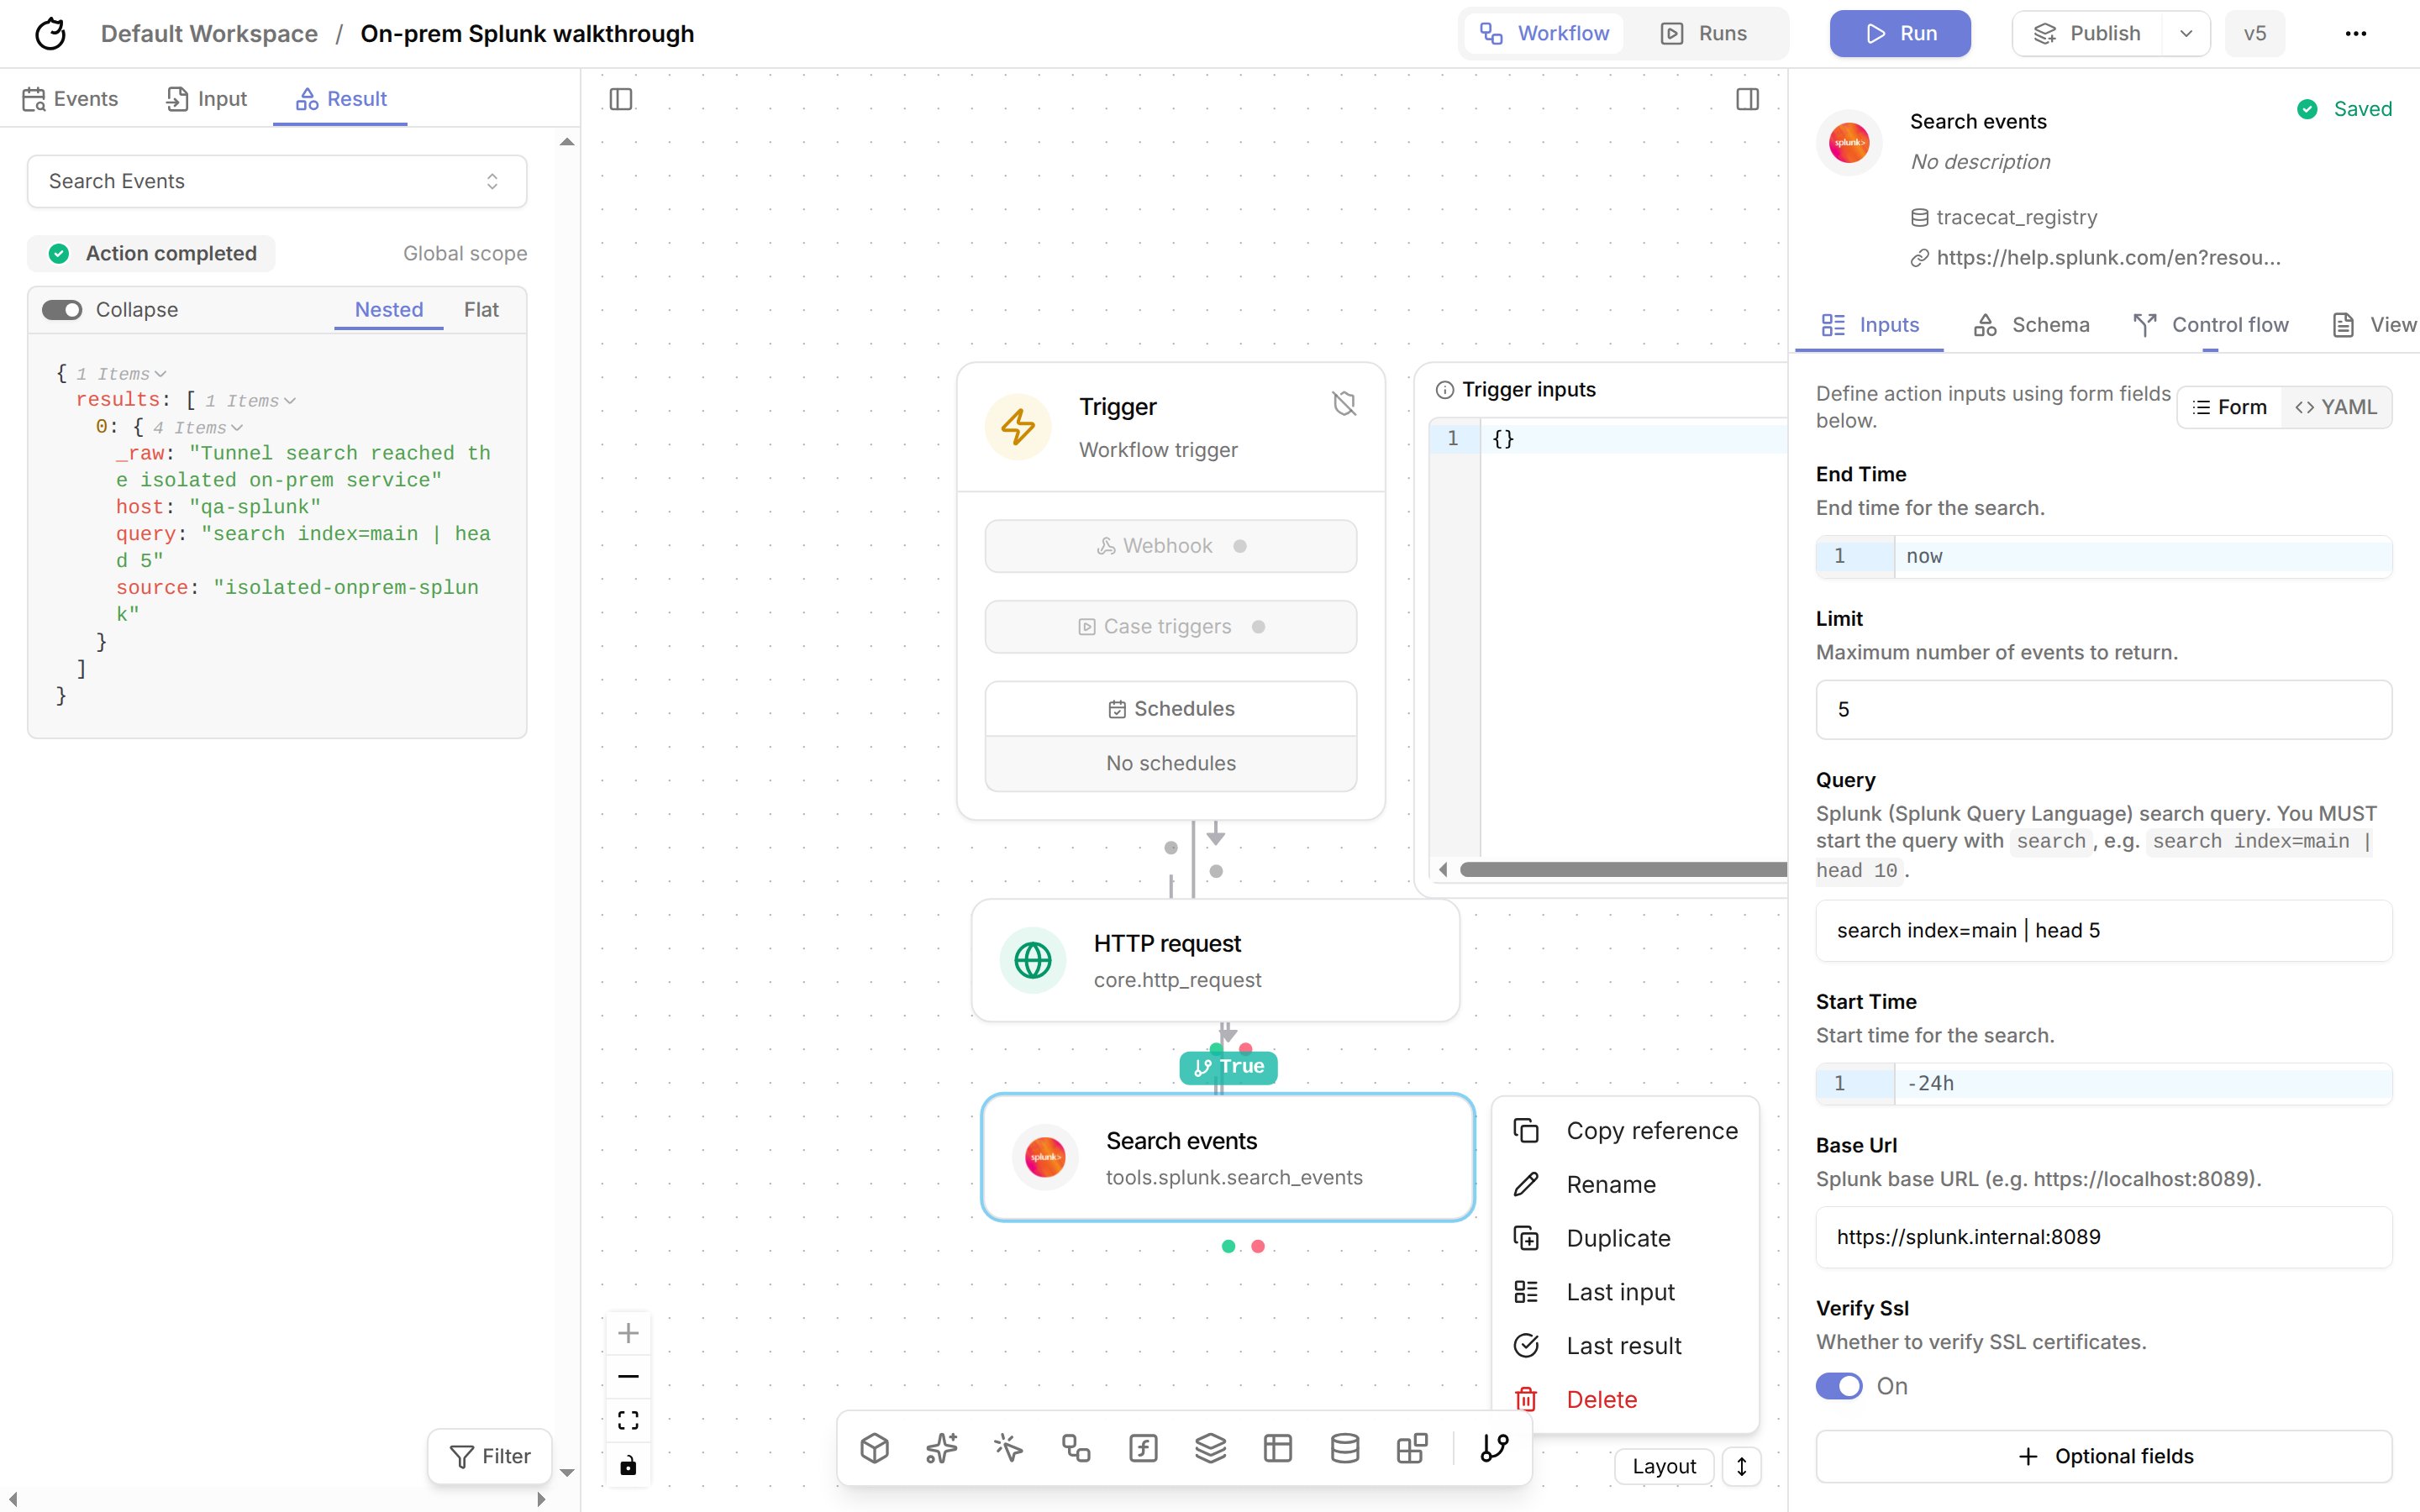
Add **Splunk: Search events**. Set `base_url` to `https://splunk.internal:8089`, `query` to a search that starts with `search`, such as `search index=main | head 10`, and the start and end times. In the **Control flow** tab, set **Tunnel** to `onprem-splunk`, or rely on the workflow's **Default tunnel**.
The action returns the search results.
### Run a Splunk search through the tunnel
Integration actions that make HTTP requests, such as **Splunk: Search events** (`tools.splunk.search_events`), use the tunnel the same way.
In **Credentials**, add a credential named `splunk` with the key `SPLUNK_API_KEY` set to a Splunk authentication token.
Add **Splunk: Search events**. Set `base_url` to `https://splunk.internal:8089`, `query` to a search that starts with `search`, such as `search index=main | head 10`, and the start and end times. In the **Control flow** tab, set **Tunnel** to `onprem-splunk`, or rely on the workflow's **Default tunnel**.
The action returns the search results.
 ### Troubleshoot
| Symptom | Fix |
| :- | :- |
| The site stays offline. | Check that the connector is running and that the host can reach the Pangolin endpoint. Check the connector logs with `docker logs tracecat-tunnel`. |
| Saving or publishing fails with a tunnel error. | Check that the tunnel name matches a tunnel in this workspace and that the action supports tunnels. |
| The action fails with `403`. | Add the host and port to the tunnel's allowed targets. Managed tunnels can't change targets, so create a new tunnel. Use the same hostname in the URL as in the target. |
| The action fails with `504`. | The connector host can't reach the target. From that host, check that the hostname resolves and the port is open. |
| The action fails with `503`, or the gateway isn't ready. | The gateway can't load the tunnel's policy. Check that the tunnel is turned on and wait for the gateway to start. |
| The action fails with a certificate error. | Add the internal CA as `ca_cert` and use the hostname on the certificate. Keep `verify_ssl` set to `true`. |
## Create a managed tunnel with the API
Call the API with a [service account API key](/api-reference/authentication) and pass `workspace_id` as a query parameter on every request.
List every private host the workspace may reach, with its exact TCP ports:
```bash theme={null}
curl -X POST "https:///api/tunnels/managed?workspace_id=" \
-H "Authorization: Bearer " \
-H "Content-Type: application/json" \
-d '{
"name": "onprem-splunk",
"description": "Splunk management API in the primary data center",
"allowed_targets": [
{"host": "splunk.internal", "ports": [8089]},
{"host": "10.20.0.15", "ports": [8089]}
]
}'
```
`host` is an exact hostname or IP address; wildcards and CIDR ranges are rejected. Each target takes 1 to 64 unique ports, and a tunnel takes up to 100 targets.
Tracecat creates a Pangolin site, one machine client for the tunnel, and one private resource per target granted only to that client. If any step fails, Tracecat deletes what it created and returns `502`.
The `201` response returns the site credentials once:
```json theme={null}
{
"tunnel": {"id": "", "name": "onprem-splunk", "managed": true, "...": "..."},
"site_id": "",
"site_secret": "",
"site_endpoint": "https://app.pangolin.net",
"site_install_command": "newt --id --secret --endpoint https://app.pangolin.net"
}
```
Store `site_secret` in your secrets manager. Tracecat does not return it again.
Run the connector on a host inside your network that can reach every target:
```bash theme={null}
docker run -d --name tracecat-tunnel --restart unless-stopped \
-e PANGOLIN_ENDPOINT= \
-e NEWT_ID= \
-e NEWT_SECRET= \
fosrl/newt
```
To run the binary directly, use `site_install_command`. The connector needs outbound access to the Pangolin endpoint only.
```bash theme={null}
curl "https:///api/tunnels//status?workspace_id=" \
-H "Authorization: Bearer "
```
`site_online` turns `true` once the connector connects.
## Bring your own Pangolin
If you already run Pangolin and manage the site, resources, and access yourself, create a machine client in Pangolin, grant it only the resources Tracecat needs, and register it:
```bash theme={null}
curl -X POST "https:///api/tunnels?workspace_id=" \
-H "Authorization: Bearer " \
-H "Content-Type: application/json" \
-d '{
"name": "onprem-splunk",
"endpoint": "https://pangolin.example.com",
"client_id": "",
"client_secret": "",
"allowed_targets": [{"host": "splunk.internal", "ports": [8089]}]
}'
```
`endpoint` must use `https`. Tracecat encrypts `client_secret` and never returns it. Keep `allowed_targets` in step with the Pangolin resources; Tracecat enforces both, so a port must appear in each.
## Route actions through a tunnel
Set the tunnel in the action's **Control flow** tab, or set **Default tunnel** in the workflow settings to route every action. An action's own tunnel overrides the workflow default. In a workflow definition, use `tunnel` on the action or `config.tunnel`:
```yaml theme={null}
config:
tunnel: onprem-splunk
actions:
- ref: search_splunk
action: core.http_request
args:
url: https://splunk.internal:8089/services/search/jobs
method: POST
```
Tracecat checks that the tunnel exists in the workspace and that your organization has the `tunnels` entitlement when you save, publish, and run the workflow. At runtime, the executor issues a short-lived token for the tunnel, sets `HTTP_PROXY` and `HTTPS_PROXY` to the tunnel's gateway, and limits the action's network to that gateway. The action fails if the tunnel is disabled or its gateway isn't available; it never falls back to direct egress. The gateway's allowed targets decide which hosts the action may reach, including private addresses.
Subflows, scatter, gather, loops, AI agent actions, and `core.script.run_python` reject an explicit `tunnel` and ignore the workflow default.
## Run the tunnel gateway
Each tunnel has one gateway. On Kubernetes with `TRACECAT__TUNNEL_GATEWAY_BACKEND=kubernetes`, the `api` service runs gateways for you: it creates a `tunnel-` Secret, Deployment, and Service per tunnel in `TRACECAT__TUNNEL_GATEWAY_NAMESPACE`, issues the gateway key for managed tunnels, scales disabled tunnels to zero, restarts the gateway after a key rotation, and deletes the objects when you delete the tunnel. A reconcile loop recreates missing objects and removes orphaned ones every minute. The [Tracecat Helm chart](https://github.com/TracecatHQ/k8s) sets this up with `tunnels.enabled`.
With the default `TRACECAT__TUNNEL_GATEWAY_BACKEND=none`, such as on Docker Compose, you run each gateway yourself with the `ghcr.io/tracecathq/tracecat-tunnel-gateway` image. It needs the tunnel's gateway key, which signs the tokens actions present:
```bash theme={null}
curl -X POST "https:///api/tunnels//gateway-key?workspace_id=" \
-H "Authorization: Bearer "
# {"tunnel_id": "", "gateway_key": ""}
```
Issuing a key revokes the previous one, and Tracecat returns each key once.
The gateway runs the Pangolin machine client and the Tracecat proxy in the same network namespace. The machine client needs `NET_ADMIN` and `/dev/net/tun`, so run gateways apart from executors and allow only executors to reach them. The gateway needs outbound TCP 443 and UDP 21820 to the Pangolin endpoint.
```bash theme={null}
docker run -d --name tunnel-gateway --cap-add NET_ADMIN --device /dev/net/tun \
-e PANGOLIN_ENDPOINT= \
-e PANGOLIN_CLIENT_ID= \
-e PANGOLIN_CLIENT_SECRET= \
-e TRACECAT_TUNNEL_ID= \
-e TRACECAT_TUNNEL_GATEWAY_KEY= \
-e TRACECAT_TUNNEL_API_URL=http://api:8000 \
ghcr.io/tracecathq/tracecat-tunnel-gateway
```
The image starts the Pangolin machine client with `--upstream-dns` set to the container's resolver, then the proxy. Set `PANGOLIN_UPSTREAM_DNS` to use a different resolver. The proxy reads:
| Variable | Default | Description |
| :- | :- | :- |
| `TRACECAT_TUNNEL_ID` | | Tunnel ID. |
| `TRACECAT_TUNNEL_GATEWAY_KEY` | | Gateway key from the endpoint above. |
| `TRACECAT_TUNNEL_API_URL` | | Internal Tracecat API URL, e.g. `http://api:8000`. |
| `TRACECAT_TUNNEL_GATEWAY_HOST` | `0.0.0.0` | Listen address. |
| `TRACECAT_TUNNEL_GATEWAY_PORT` | `8080` | Listen port. |
| `TRACECAT_TUNNEL_GATEWAY_BLOCKED_CIDRS` | | Comma-separated CIDRs the gateway never dials, in addition to the built-in list. |
The gateway loads the tunnel's workspace and allowed targets from the Tracecat API with its gateway key, and refreshes them every 15 seconds. Within one refresh of you disabling or deleting the tunnel, issuing a new gateway key, or removing a target, the gateway rejects new requests and closes the affected open connections. After a key rotation, restart the gateway with the new key; Tracecat-run gateways restart automatically. If the gateway can't reach the API for 60 seconds, it stops accepting requests until the API is back.
The gateway resolves each target once and dials the resolved address. It refuses loopback, link-local, cloud metadata, multicast, and unspecified addresses, the Tracecat API's own addresses, and any CIDR in `TRACECAT_TUNNEL_GATEWAY_BLOCKED_CIDRS`, even when a hostname in the allowed targets resolves to one of them. On Kubernetes, the `api` service passes `TRACECAT__TUNNEL_GATEWAY_BLOCKED_CIDRS` to every gateway; set it to the cluster's pod and service ranges.
The gateway answers `407` for a missing, expired, or wrong-tunnel token, `403` for a host or port outside the allowed targets, a blocked address, or a revoked tunnel, `503` while it can't load the tunnel's policy, and `504` when Pangolin does not reach the target. It never falls back to direct egress.
## Use TLS with private services
Allowed targets limit which host and TCP port a connection opens to, not which application answers on it. The gateway relays TLS without decrypting it, so a client can pick another virtual host on the same IP address and port with SNI or the `Host` header. Don't rely on allowed targets to isolate applications behind a shared reverse proxy; give each one its own address or port, or restrict access at the proxy.
HTTPS through a tunnel stays encrypted end to end. The gateway relays the TLS connection without decrypting it, and the action verifies the server certificate against the hostname in the URL, such as `splunk.internal`. Issue the certificate for the hostname you list in `allowed_targets`.
If an internal CA signs the certificate, add the CA to the workspace:
In the workspace, open **Credentials** and select **Add credential**. Name the secret `ca_cert`, set **Type** to **CA certificate**, paste the PEM-encoded CA certificate, and select **Create secret**. Tracecat stores it as the `CA_CERTIFICATE` key.
### Troubleshoot
| Symptom | Fix |
| :- | :- |
| The site stays offline. | Check that the connector is running and that the host can reach the Pangolin endpoint. Check the connector logs with `docker logs tracecat-tunnel`. |
| Saving or publishing fails with a tunnel error. | Check that the tunnel name matches a tunnel in this workspace and that the action supports tunnels. |
| The action fails with `403`. | Add the host and port to the tunnel's allowed targets. Managed tunnels can't change targets, so create a new tunnel. Use the same hostname in the URL as in the target. |
| The action fails with `504`. | The connector host can't reach the target. From that host, check that the hostname resolves and the port is open. |
| The action fails with `503`, or the gateway isn't ready. | The gateway can't load the tunnel's policy. Check that the tunnel is turned on and wait for the gateway to start. |
| The action fails with a certificate error. | Add the internal CA as `ca_cert` and use the hostname on the certificate. Keep `verify_ssl` set to `true`. |
## Create a managed tunnel with the API
Call the API with a [service account API key](/api-reference/authentication) and pass `workspace_id` as a query parameter on every request.
List every private host the workspace may reach, with its exact TCP ports:
```bash theme={null}
curl -X POST "https:///api/tunnels/managed?workspace_id=" \
-H "Authorization: Bearer " \
-H "Content-Type: application/json" \
-d '{
"name": "onprem-splunk",
"description": "Splunk management API in the primary data center",
"allowed_targets": [
{"host": "splunk.internal", "ports": [8089]},
{"host": "10.20.0.15", "ports": [8089]}
]
}'
```
`host` is an exact hostname or IP address; wildcards and CIDR ranges are rejected. Each target takes 1 to 64 unique ports, and a tunnel takes up to 100 targets.
Tracecat creates a Pangolin site, one machine client for the tunnel, and one private resource per target granted only to that client. If any step fails, Tracecat deletes what it created and returns `502`.
The `201` response returns the site credentials once:
```json theme={null}
{
"tunnel": {"id": "", "name": "onprem-splunk", "managed": true, "...": "..."},
"site_id": "",
"site_secret": "",
"site_endpoint": "https://app.pangolin.net",
"site_install_command": "newt --id --secret --endpoint https://app.pangolin.net"
}
```
Store `site_secret` in your secrets manager. Tracecat does not return it again.
Run the connector on a host inside your network that can reach every target:
```bash theme={null}
docker run -d --name tracecat-tunnel --restart unless-stopped \
-e PANGOLIN_ENDPOINT= \
-e NEWT_ID= \
-e NEWT_SECRET= \
fosrl/newt
```
To run the binary directly, use `site_install_command`. The connector needs outbound access to the Pangolin endpoint only.
```bash theme={null}
curl "https:///api/tunnels//status?workspace_id=" \
-H "Authorization: Bearer "
```
`site_online` turns `true` once the connector connects.
## Bring your own Pangolin
If you already run Pangolin and manage the site, resources, and access yourself, create a machine client in Pangolin, grant it only the resources Tracecat needs, and register it:
```bash theme={null}
curl -X POST "https:///api/tunnels?workspace_id=" \
-H "Authorization: Bearer " \
-H "Content-Type: application/json" \
-d '{
"name": "onprem-splunk",
"endpoint": "https://pangolin.example.com",
"client_id": "",
"client_secret": "",
"allowed_targets": [{"host": "splunk.internal", "ports": [8089]}]
}'
```
`endpoint` must use `https`. Tracecat encrypts `client_secret` and never returns it. Keep `allowed_targets` in step with the Pangolin resources; Tracecat enforces both, so a port must appear in each.
## Route actions through a tunnel
Set the tunnel in the action's **Control flow** tab, or set **Default tunnel** in the workflow settings to route every action. An action's own tunnel overrides the workflow default. In a workflow definition, use `tunnel` on the action or `config.tunnel`:
```yaml theme={null}
config:
tunnel: onprem-splunk
actions:
- ref: search_splunk
action: core.http_request
args:
url: https://splunk.internal:8089/services/search/jobs
method: POST
```
Tracecat checks that the tunnel exists in the workspace and that your organization has the `tunnels` entitlement when you save, publish, and run the workflow. At runtime, the executor issues a short-lived token for the tunnel, sets `HTTP_PROXY` and `HTTPS_PROXY` to the tunnel's gateway, and limits the action's network to that gateway. The action fails if the tunnel is disabled or its gateway isn't available; it never falls back to direct egress. The gateway's allowed targets decide which hosts the action may reach, including private addresses.
Subflows, scatter, gather, loops, AI agent actions, and `core.script.run_python` reject an explicit `tunnel` and ignore the workflow default.
## Run the tunnel gateway
Each tunnel has one gateway. On Kubernetes with `TRACECAT__TUNNEL_GATEWAY_BACKEND=kubernetes`, the `api` service runs gateways for you: it creates a `tunnel-` Secret, Deployment, and Service per tunnel in `TRACECAT__TUNNEL_GATEWAY_NAMESPACE`, issues the gateway key for managed tunnels, scales disabled tunnels to zero, restarts the gateway after a key rotation, and deletes the objects when you delete the tunnel. A reconcile loop recreates missing objects and removes orphaned ones every minute. The [Tracecat Helm chart](https://github.com/TracecatHQ/k8s) sets this up with `tunnels.enabled`.
With the default `TRACECAT__TUNNEL_GATEWAY_BACKEND=none`, such as on Docker Compose, you run each gateway yourself with the `ghcr.io/tracecathq/tracecat-tunnel-gateway` image. It needs the tunnel's gateway key, which signs the tokens actions present:
```bash theme={null}
curl -X POST "https:///api/tunnels//gateway-key?workspace_id=" \
-H "Authorization: Bearer "
# {"tunnel_id": "", "gateway_key": ""}
```
Issuing a key revokes the previous one, and Tracecat returns each key once.
The gateway runs the Pangolin machine client and the Tracecat proxy in the same network namespace. The machine client needs `NET_ADMIN` and `/dev/net/tun`, so run gateways apart from executors and allow only executors to reach them. The gateway needs outbound TCP 443 and UDP 21820 to the Pangolin endpoint.
```bash theme={null}
docker run -d --name tunnel-gateway --cap-add NET_ADMIN --device /dev/net/tun \
-e PANGOLIN_ENDPOINT= \
-e PANGOLIN_CLIENT_ID= \
-e PANGOLIN_CLIENT_SECRET= \
-e TRACECAT_TUNNEL_ID= \
-e TRACECAT_TUNNEL_GATEWAY_KEY= \
-e TRACECAT_TUNNEL_API_URL=http://api:8000 \
ghcr.io/tracecathq/tracecat-tunnel-gateway
```
The image starts the Pangolin machine client with `--upstream-dns` set to the container's resolver, then the proxy. Set `PANGOLIN_UPSTREAM_DNS` to use a different resolver. The proxy reads:
| Variable | Default | Description |
| :- | :- | :- |
| `TRACECAT_TUNNEL_ID` | | Tunnel ID. |
| `TRACECAT_TUNNEL_GATEWAY_KEY` | | Gateway key from the endpoint above. |
| `TRACECAT_TUNNEL_API_URL` | | Internal Tracecat API URL, e.g. `http://api:8000`. |
| `TRACECAT_TUNNEL_GATEWAY_HOST` | `0.0.0.0` | Listen address. |
| `TRACECAT_TUNNEL_GATEWAY_PORT` | `8080` | Listen port. |
| `TRACECAT_TUNNEL_GATEWAY_BLOCKED_CIDRS` | | Comma-separated CIDRs the gateway never dials, in addition to the built-in list. |
The gateway loads the tunnel's workspace and allowed targets from the Tracecat API with its gateway key, and refreshes them every 15 seconds. Within one refresh of you disabling or deleting the tunnel, issuing a new gateway key, or removing a target, the gateway rejects new requests and closes the affected open connections. After a key rotation, restart the gateway with the new key; Tracecat-run gateways restart automatically. If the gateway can't reach the API for 60 seconds, it stops accepting requests until the API is back.
The gateway resolves each target once and dials the resolved address. It refuses loopback, link-local, cloud metadata, multicast, and unspecified addresses, the Tracecat API's own addresses, and any CIDR in `TRACECAT_TUNNEL_GATEWAY_BLOCKED_CIDRS`, even when a hostname in the allowed targets resolves to one of them. On Kubernetes, the `api` service passes `TRACECAT__TUNNEL_GATEWAY_BLOCKED_CIDRS` to every gateway; set it to the cluster's pod and service ranges.
The gateway answers `407` for a missing, expired, or wrong-tunnel token, `403` for a host or port outside the allowed targets, a blocked address, or a revoked tunnel, `503` while it can't load the tunnel's policy, and `504` when Pangolin does not reach the target. It never falls back to direct egress.
## Use TLS with private services
Allowed targets limit which host and TCP port a connection opens to, not which application answers on it. The gateway relays TLS without decrypting it, so a client can pick another virtual host on the same IP address and port with SNI or the `Host` header. Don't rely on allowed targets to isolate applications behind a shared reverse proxy; give each one its own address or port, or restrict access at the proxy.
HTTPS through a tunnel stays encrypted end to end. The gateway relays the TLS connection without decrypting it, and the action verifies the server certificate against the hostname in the URL, such as `splunk.internal`. Issue the certificate for the hostname you list in `allowed_targets`.
If an internal CA signs the certificate, add the CA to the workspace:
In the workspace, open **Credentials** and select **Add credential**. Name the secret `ca_cert`, set **Type** to **CA certificate**, paste the PEM-encoded CA certificate, and select **Create secret**. Tracecat stores it as the `CA_CERTIFICATE` key.
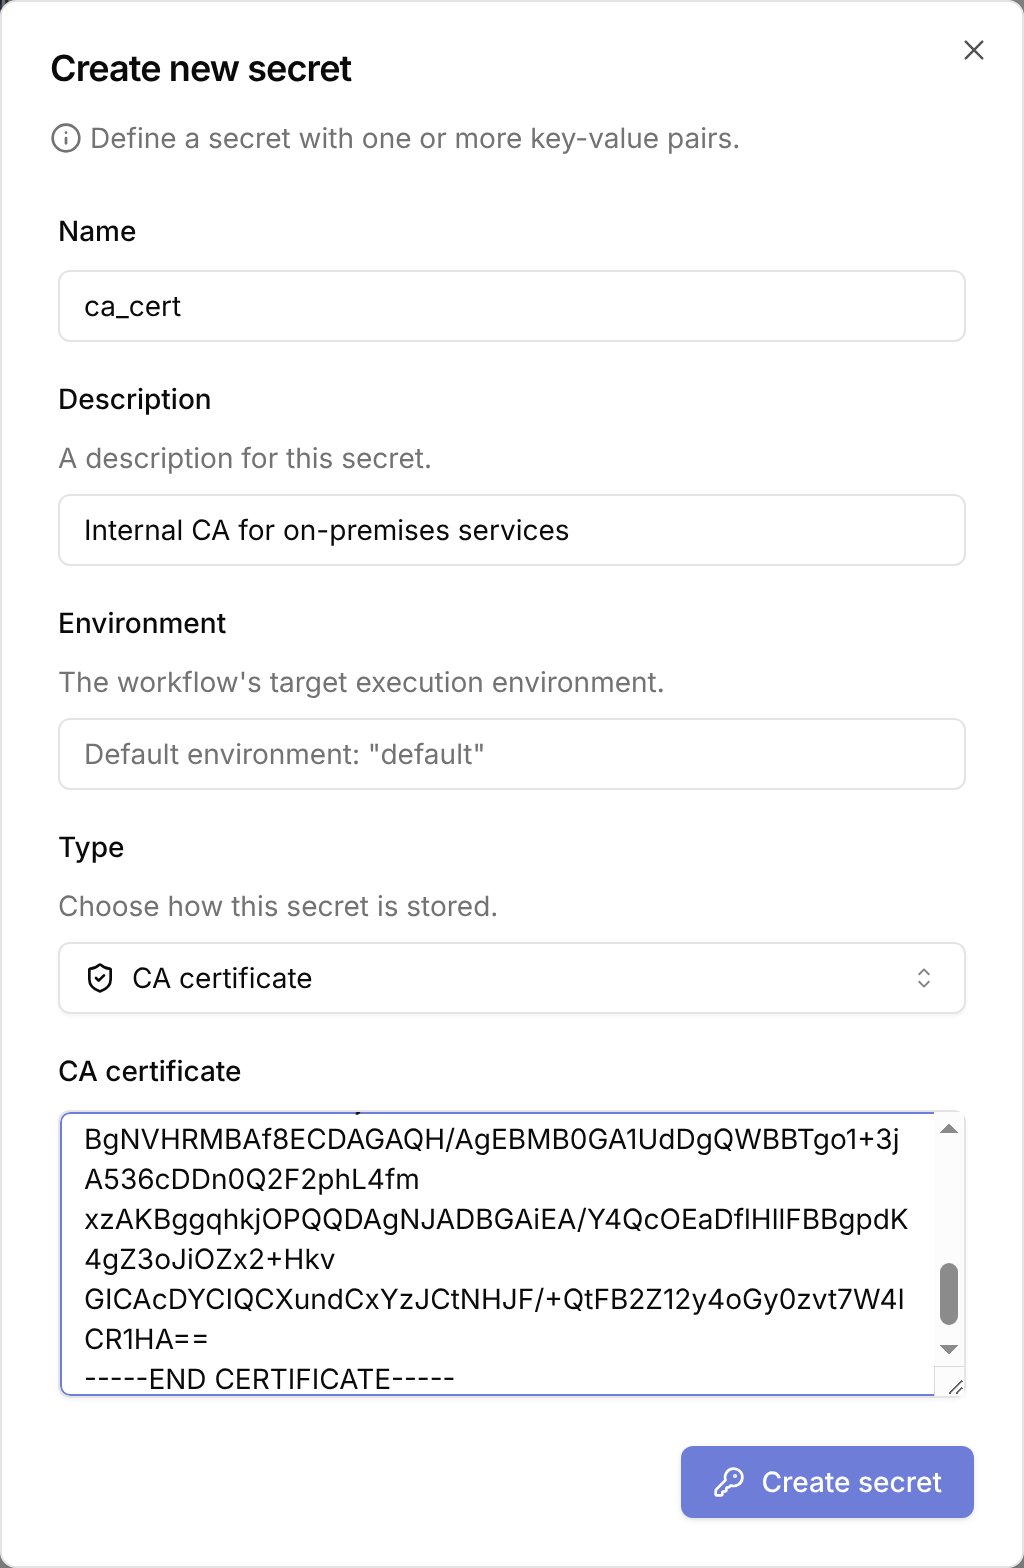 `core.http_request`, `core.http_poll`, and `core.http_paginate` load the `ca_cert` credential automatically. Leave `verify_ssl` set to `true`; requests then fail if the certificate does not chain to your CA or does not match the hostname.
If the service requires client certificates, add a credential named `mtls` with the **mTLS certificate + key** type. See [Secrets](/automations/core-concepts/secrets) for every credential type.
Plain `http://` requests are encrypted inside the Pangolin tunnel, but not between the site connector and the target, and the gateway can read them. Prefer `https://` for anything that carries credentials.
## Manage tunnels
* List tunnels with `GET /tunnels` and read one with `GET /tunnels/{tunnel_id}`.
* Rename, describe, or disable a tunnel with `PATCH /tunnels/{tunnel_id}`. Managed tunnels reject changes to `endpoint`, `client_id`, `client_secret`, and `allowed_targets`; create a new managed tunnel to change targets.
* Delete a tunnel with `DELETE /tunnels/{tunnel_id}`. For managed tunnels, Tracecat deletes the Pangolin resources, machine client, and site first. If Pangolin cleanup fails, the request returns `502` and keeps the tunnel so you can retry. Stop the site connector afterwards.
## Configure Pangolin for self-hosted Tracecat
Tracecat Cloud manages Pangolin for you, so this section applies only to self-hosted Tracecat. Managed tunnels provision Pangolin through its Integration API.
Deploy Pangolin separately and enable its [Integration API](https://docs.pangolin.net). The API base URL ends in `/v1`.
In the Pangolin dashboard, open your organization's API keys and create a key with these permissions:
* Sites: pick site defaults, create, get, and delete.
* Clients: pick client defaults, create, get, and delete.
* Private resources: create, get, delete, and list resource clients.
Set these on the `api` service and restart it:
```bash theme={null}
TRACECAT__PANGOLIN_ENDPOINT=https://pangolin.example.com
TRACECAT__PANGOLIN_API_URL=https://pangolin.example.com/v1
TRACECAT__PANGOLIN_ORG_ID=
TRACECAT__PANGOLIN_API_KEY=
```
Managed tunnels stay off until all four are set. See [Environment variables](/self-hosting/environment-variables).
## Related pages
* See [HTTP](/automations/core-actions/request-actions/http#private-services) for calling private services with `core.http_request`.
* See [Python UDFs](/custom-actions/python-udf#private-network-access) for keeping custom actions compatible with tunnels.
* See [Roles and permissions](/manage-platform/rbac) for which built-in roles hold the `tunnel:*` scopes.
This documentation is built and hosted on [Mintlify](https://mintlify.com), a developer documentation platform.
`core.http_request`, `core.http_poll`, and `core.http_paginate` load the `ca_cert` credential automatically. Leave `verify_ssl` set to `true`; requests then fail if the certificate does not chain to your CA or does not match the hostname.
If the service requires client certificates, add a credential named `mtls` with the **mTLS certificate + key** type. See [Secrets](/automations/core-concepts/secrets) for every credential type.
Plain `http://` requests are encrypted inside the Pangolin tunnel, but not between the site connector and the target, and the gateway can read them. Prefer `https://` for anything that carries credentials.
## Manage tunnels
* List tunnels with `GET /tunnels` and read one with `GET /tunnels/{tunnel_id}`.
* Rename, describe, or disable a tunnel with `PATCH /tunnels/{tunnel_id}`. Managed tunnels reject changes to `endpoint`, `client_id`, `client_secret`, and `allowed_targets`; create a new managed tunnel to change targets.
* Delete a tunnel with `DELETE /tunnels/{tunnel_id}`. For managed tunnels, Tracecat deletes the Pangolin resources, machine client, and site first. If Pangolin cleanup fails, the request returns `502` and keeps the tunnel so you can retry. Stop the site connector afterwards.
## Configure Pangolin for self-hosted Tracecat
Tracecat Cloud manages Pangolin for you, so this section applies only to self-hosted Tracecat. Managed tunnels provision Pangolin through its Integration API.
Deploy Pangolin separately and enable its [Integration API](https://docs.pangolin.net). The API base URL ends in `/v1`.
In the Pangolin dashboard, open your organization's API keys and create a key with these permissions:
* Sites: pick site defaults, create, get, and delete.
* Clients: pick client defaults, create, get, and delete.
* Private resources: create, get, delete, and list resource clients.
Set these on the `api` service and restart it:
```bash theme={null}
TRACECAT__PANGOLIN_ENDPOINT=https://pangolin.example.com
TRACECAT__PANGOLIN_API_URL=https://pangolin.example.com/v1
TRACECAT__PANGOLIN_ORG_ID=
TRACECAT__PANGOLIN_API_KEY=
```
Managed tunnels stay off until all four are set. See [Environment variables](/self-hosting/environment-variables).
## Related pages
* See [HTTP](/automations/core-actions/request-actions/http#private-services) for calling private services with `core.http_request`.
* See [Python UDFs](/custom-actions/python-udf#private-network-access) for keeping custom actions compatible with tunnels.
* See [Roles and permissions](/manage-platform/rbac) for which built-in roles hold the `tunnel:*` scopes.
This documentation is built and hosted on [Mintlify](https://mintlify.com), a developer documentation platform.